Greetings, developers! In today’s article we will explore the ‘CHOP to’ SOP operator in TouchDesigner, and showcase its capabilities with a set of basic examples. This is an operator that can provide immediate engaging results but is often overlooked. Let’s change that!
TouchDesigner Beginner Tutorial Series
If you’re a TouchDesigner Beginner, check out our TouchDesigner Tutorial Series!
We teach you all the basics of how to use TouchDesigner, including mouse controls, hotkeys, parameters, the operator families, and more.
CHOP to SOP
The ‘CHOP to’ SOP operator offers the ability to convert TouchDesigner Channel Operators (CHOPs) information into TouchDesigner Surface Operators (SOPs) structures. Essentially, the operator obtains data from the CHOP channels and utilizes it to affect geometry in the SOP network. Keep in mind that this is a “Filter” operator and not a “Generator.” This means that it needs an input in order to provide an output. After providing an input the resulting shapes in the SOP network can be altered and managed with further operators, of course.
This tool ends up coming handy since we can cleverly create and change 3D geometric data with the help of input from CHOPs, creating an interactive and procedural way to handle visuals and simulations.
Example files
All the example project files for each example are available at the end of each section, so don’t miss those!
The operator
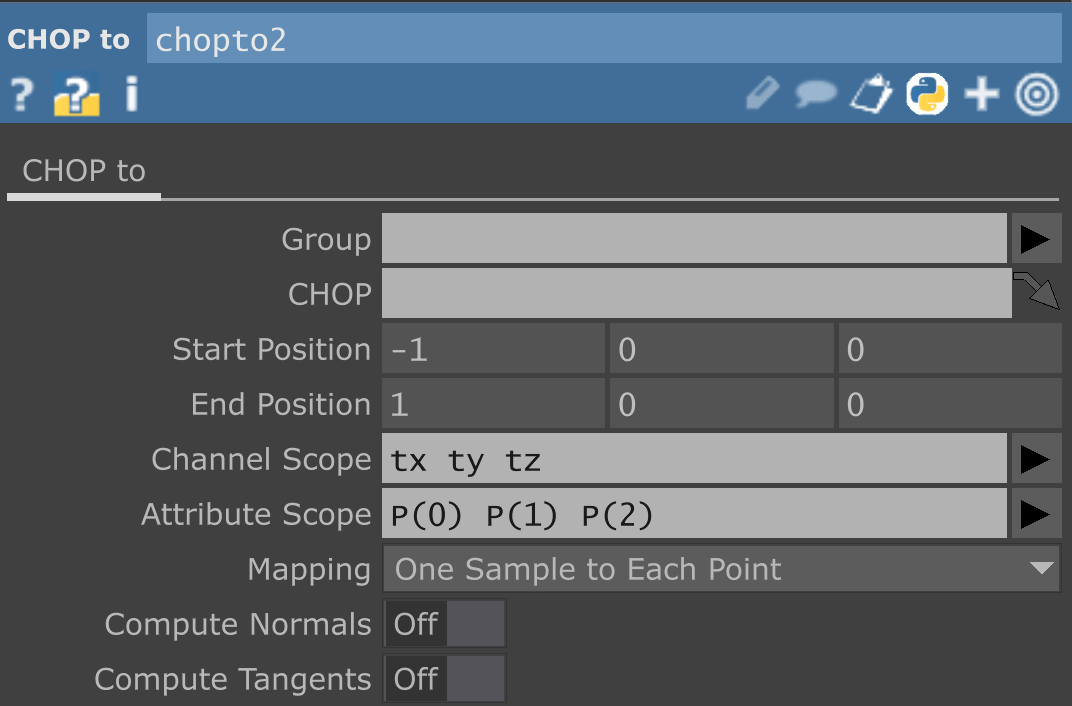
Here’s the documentation for the operator’s parameters:
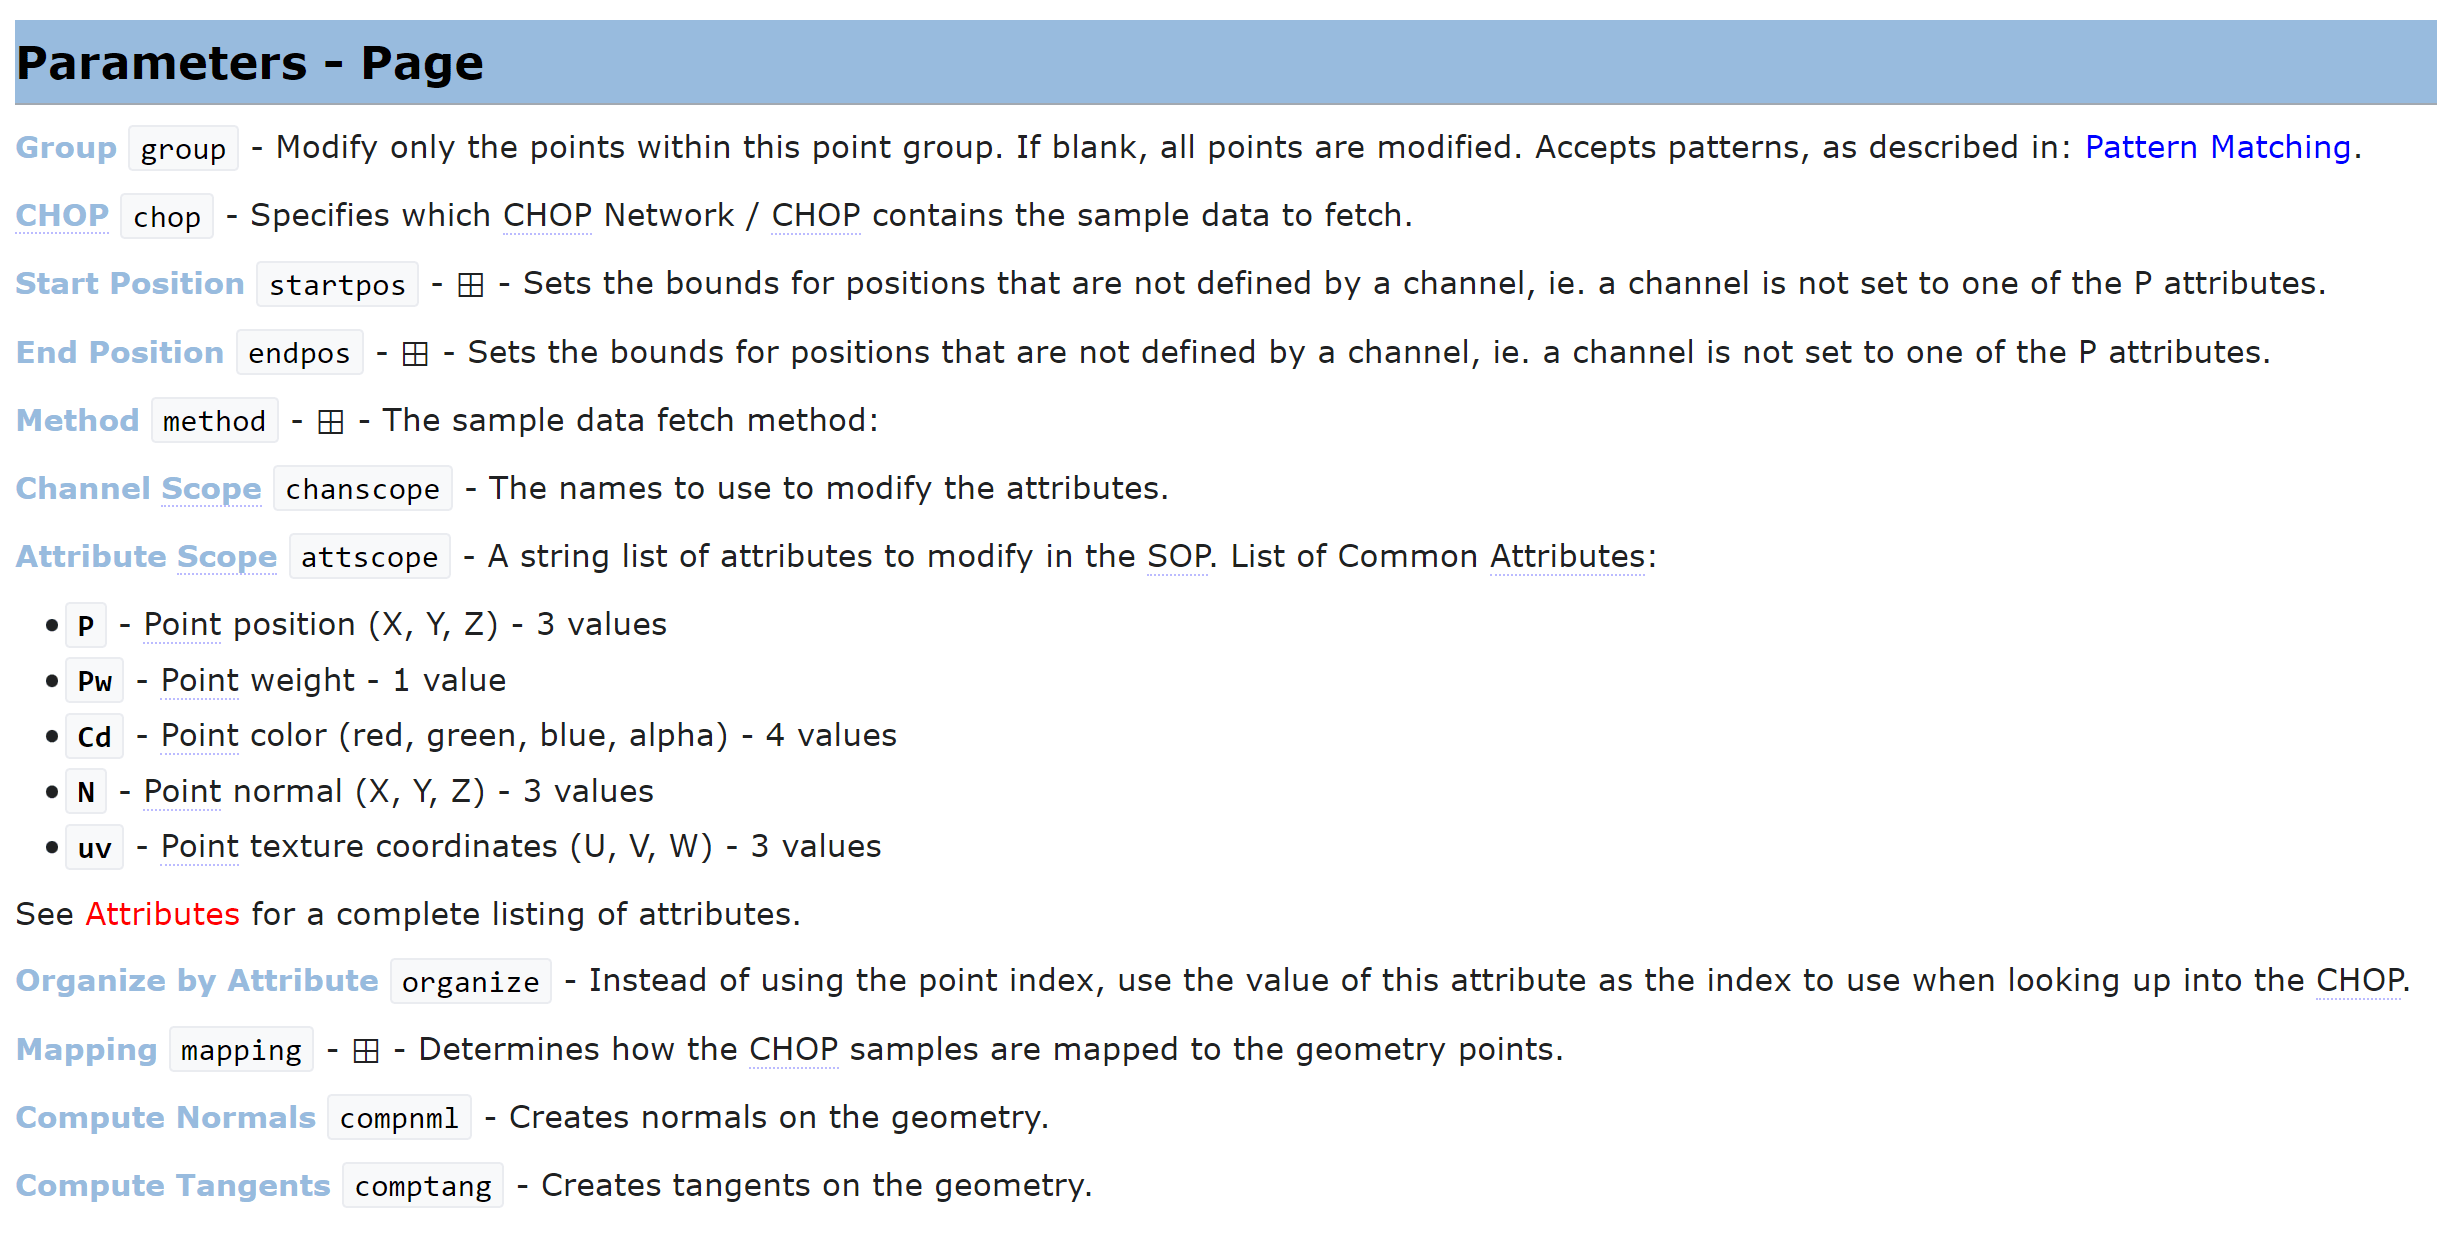
Now, let’s start setting some examples up!
Wave Grid
Here’s a very simple yet beautiful effect: making a grid wave!
Here’s how the network looks:

Let’s start by creating a render setup and adding a Grid as our Generator. Additionally let’s include our CHOP to SOP in our chain.
In parallel, let’s add a CHOP chain with Pattern, Math and Null CHOPs. Now, keep in mind that in our CHOP to operator we have two crucial parameters: Channel Scope and Attribute Scope. Channel scope is where we are pulling data from, in this case ‘chan1’, which comes from our Pattern CHOP. Attribute scope is where we map the incoming data to an attribute of our 3D geometry, and filter its structure.
For the Pattern CHOP make sure to set the Sample to the number of points of your geometry, as good practice, even though the ‘mapping’ parameter can take care of this. Also, animate the pattern by using the Python expression ‘abs.time.seconds’

This is what the CHOP to SOP looks like for this example:

However, feel free to experiment and plugin different parameters to be referenced. Look at how different it looks when referencing the position(0) channel (or x axis. Remember P(0) is x, P(1) is y and P(2) is z.)
Extra tip: experiment with different inputs for your CHOP chain!
Example file download
Particles and CHOP to SOP
If you haven’t experimented much with particles I encourage you to try inputting data to these systems! Let’s make this faux vortex:
Here’s what our network looks like:

Let’s start by creating a Sphere and modifying its scale. This sphere will go to our geometry and be the object we instance on all the points in our particle system.
Now, let’s create our particle system that will act as our instancing data. In this case we are adding a Grid as our emitter, which we filter through a Sort (for random point emission) and finally through a Particle operator.

Next, let’s instance the Translate parameter with the end of our chain and set the translation of axes to our P values:
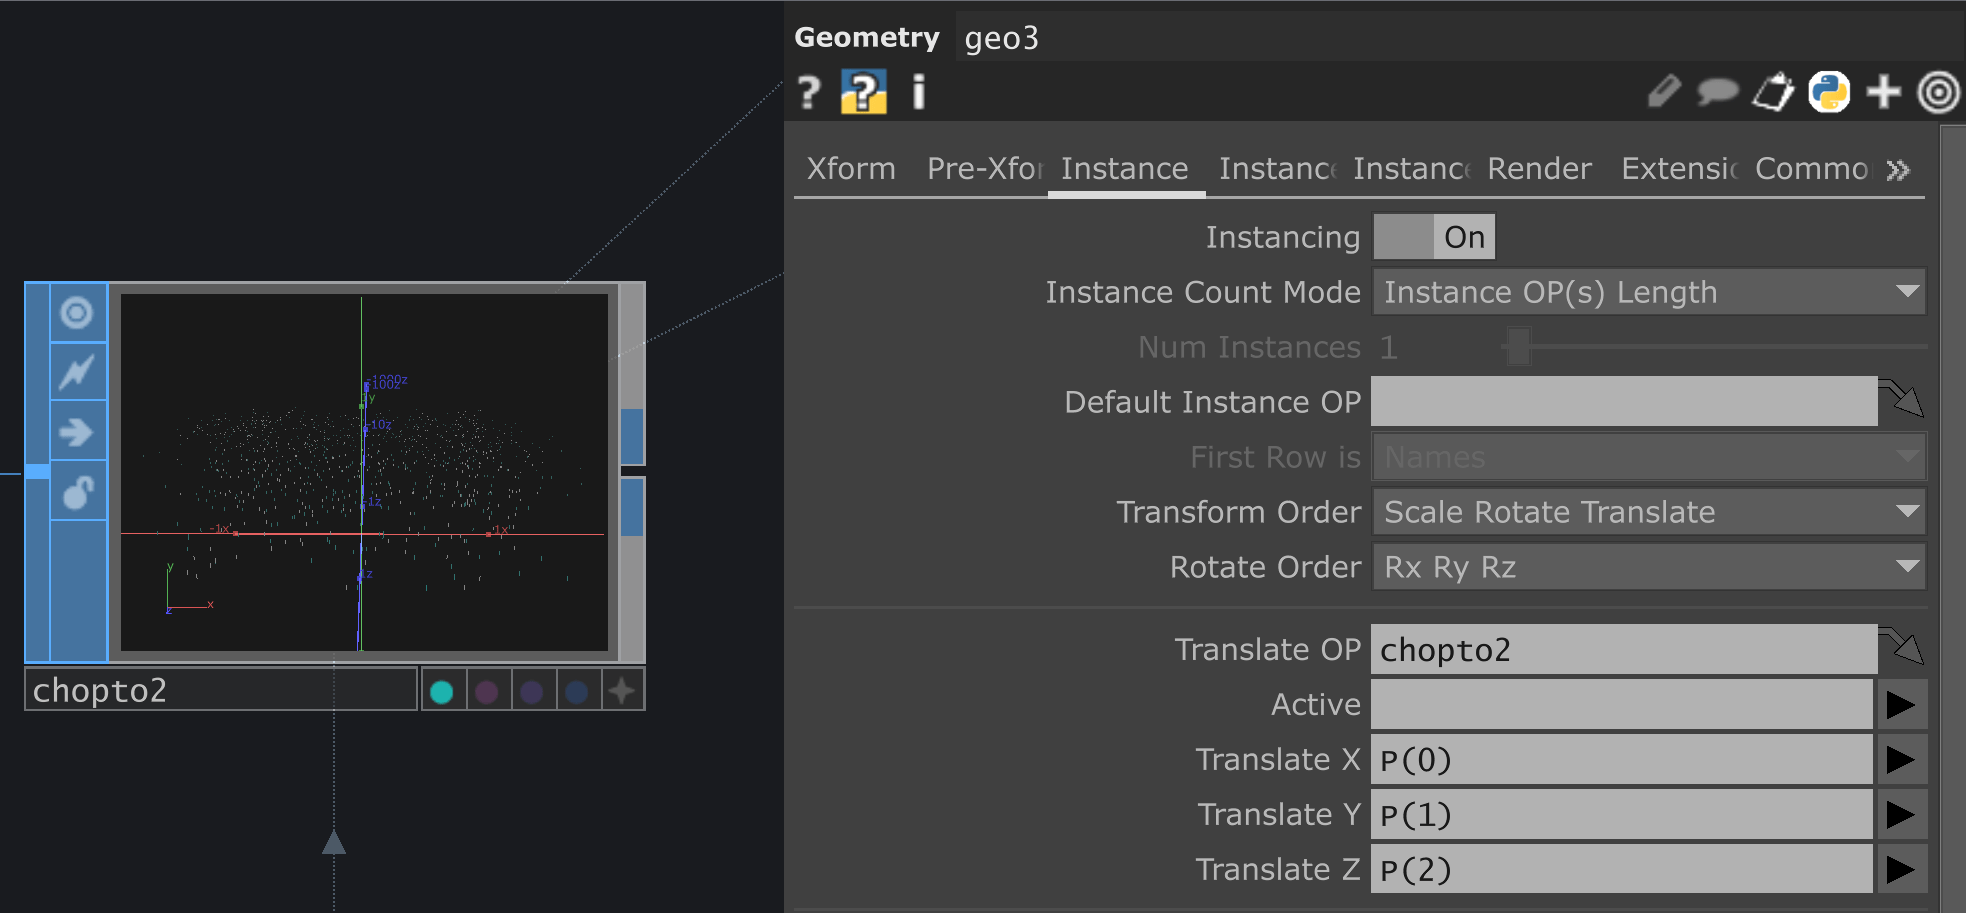
Adjust the Particle operator’s parameters to your taste, thinking about how many particles you want, how long they “live,” etc.
In our parallel, let’s add a CHOP chain with Pattern, Math and Null operators. These are the operators from which we will be pulling information from:

Also, set the attribute scope to your desired value. Experiment here!
In the case of the vortex we are affecting the P(0) position.

Although it’s not visible enough in this gif, here is the comparison of what the particle system looks like before and after the CHOP to SOP operator. On the left image we have a uniform ascent and on the right we have a circular illusion movement:
Recap
In this case we are having our Channel scope (‘chan1’ from our Pattern CHOP) filter our 3D geometry and affect the P(0) position (x axis) of our structure.
Now, since we are mapping a sine pattern to our structure the result is our particles having this pattern applied to their displacement. Meaning that the particles now move along this pattern’s shape on the x axis!
However, remember that we are sorting our geometry before our CHOP to SOP, in this case with a random Point sort. This is what allows the structure to have this scattered look!
Here is what the structure looks like without our sort (the broken pattern in the sine wave is due to the emission per row of our Grid operator):
Now here is what it looks like with the random Point sort:
Lastly, play around with the camera settings to look at the geometry from different points of view until you like the results! Our result and the illusion of rotation comes from looking straight down on the above image. that’s why the particles overlap and move in opposite directions.
Project file download
Get Our 7 Core TouchDesigner Templates, FREE
We’re making our 7 core project file templates available – for free.
These templates shed light into the most useful and sometimes obtuse features of TouchDesigner.
They’re designed to be immediately applicable for the complete TouchDesigner beginner, while also providing inspiration for the advanced user.
Tips to keep in mind
- The basis of the CHOP to SOP operator is the input that we give to our geometry. In this case experiment with basic examples like patterns and noises, but be mindful to try other inputs, for example textures, video etc. (All these must be converted, of course!)
- The setting of the ‘mapping’ parameter can yield different results, try both for every creation.
- Once you have found a CHOP to setup you like, try changing the ‘Generator’ operator in order to see the same settings affecting different geometries!
Wrap Up
I hope this overview of the CHOP to SOP in TouchDesigner has been enlightening and inspiring. I’m sure you are already thinking of some possible ideas with this operator. Please share with us (through our social media channels) your results! We are looking forward to them.
Until next time!