Hey everyone, welcome to our TouchDesigner Beginner Course! We’re really excited to have you here. One of our main goals is to teach you the fundamentals of TouchDesigner so you can confidently start creating and collaborating on media-based performances.
TouchDesigner is a powerful visual programming tool that lets users create and modify projects by connecting visual elements—such as nodes and wires—instead of writing lines of code. This tutorial is designed for beginners and creative professionals interested in learning TouchDesigner for interactive media projects. Learning TouchDesigner opens up opportunities in live performance, interactive installations, and generative art.
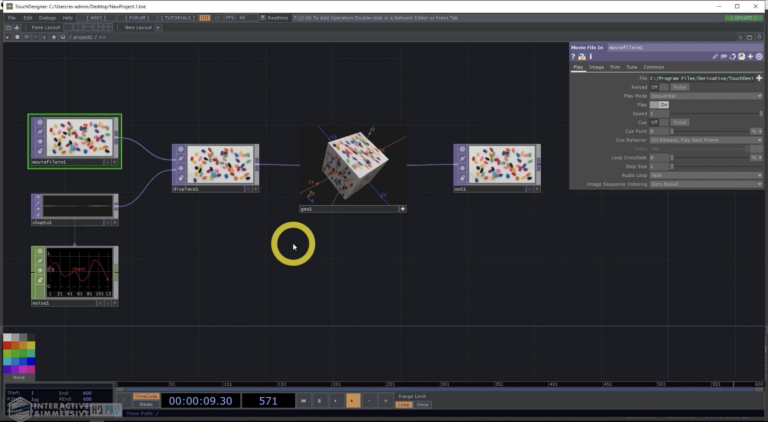
TouchDesigner is a procedural node-based visual programming environment that combines elements of Processing, After Effects, and 3D modeling software. It is a real-time visual development platform used to create interactive multimedia content without traditional text-based coding. In TouchDesigner, the interface uses a network of nodes, known as operators, which can be connected to transfer information logically.
By focusing on nodes and their connections, users can process video, audio, and data in real time, making it easy to experiment and iterate on creative ideas. This method allows you to see the flow of your project visually, making complex programming concepts more accessible and intuitive. Whether you’re designing interactive installations, creating performances, or developing fixed media works, TouchDesigner’s visual programming environment empowers you to focus on creativity and project development, rather than getting bogged down in traditional programming syntax.
For artists and creative developers, this means you can quickly prototype, modify, and expand your projects—whether you’re working with video, audio, or data—using a flexible, node-based system that’s designed for rapid experimentation and innovation.
In this tutorial, we’ll cover the basics of TouchDesigner, its unique features, and how to get started, providing a clear entry point for beginners seeking an overview and practical guidance.
My name is Elburz Sorkhabi and I’m going to be one of your instructors for these TouchDesigner beginner tutorials. If you’re new to TouchDesigner, these videos cover essential concepts to help you get up and running quickly. If you’re already familiar with Touchdesigner then they also offer great refreshers of its many features.
I’m the Co-Founder of The Interactive & Immersive HQ and one of the top TouchDesigner developers in the world. Over my career, I’ve performed on some of the largest stages, developed custom software for the biggest brands, led teams across the globe deploying large-scale media-art installations, authored the first TouchDesigner book, and taught dozens of workshops at leading universities.
I’ve created technical solutions for a vast range of clients including Google, Kanye West, Netflix, Burj Khalifa, Nike, Under Armour, IBM, Visa, AMEX, Verizon, T-Mobile, and many more through new works in venues in Los Angeles, New York, Seattle, San Francisco, Toronto, Montreal, Dubai, Shanghai, Singapore, Tokyo, London, and Paris.
Over the last ten years of my career being a TouchDesigner developer, I’ve taught hundreds of other developers and helped teams learn and teach TouchDesigner to ensure effective collaboration. Now I’m here to help you.
In this course, you’ll learn:
The fundamentals of the TouchDesigner paradigm: Never used a node-based programming environment before? I’ll show you the basics of TD logic, data, interface and workflows, explaining exactly what nodes and wires are and how they work.
Operator Families: All six of the families of operators (channel operators, surface operators, etc.), their parameters, how they integrate with the TouchDesigner workflow, the operation of each operator family, and an example video project for each.
Real-time generative graphics basics: Generate graphics using dynamic noise data in real-time, create audio-responsive 3D geometry, and more. We’ll go through multiple examples of how to create beautiful generative content, including how to use different inputs such as MIDI, OSC, video, and audio to drive your visuals.
Preset System: My simple, day-1 preset system that anyone can use to create presets without any prior TouchDesigner experience.
Keyboard Shortcuts and Application Tricks: Useful shortcuts and tricks in TouchDesigner to speed up your workflow.
Interactive, immersive, and generative art and media, ads, and videos are the reason you’re investing your time in TouchDesigner courses, and my tutorials helps you get started creating right away on just that.
If you’ve read this far already, take it as a sign to get started working on your TouchDesigner skills now!
Now that you know what to expect, let’s dive into why learning TouchDesigner is so valuable.
We have to be certain of our reasons and justify why you should learn TouchDesigner and why it’s worth sticking with it. It’s an important question to ask because TouchDesigner isn’t exactly an easy software to learn, but for me the answer is not complex. If you’re a creative, there are few software platforms that can match its abilities.
TouchDesigner was made by Canadian company Derivative (founded by Greg Hermanovic, Rob Bairos, and Jarrett Smith), and is a procedural node-based visual programming environment that combines elements of Processing, After Effects, and 3D modeling software. It’s really unique and unlimited in all kinds of different directions. It’s very hard to come across something that it’s not able to do, as long as you have the hardware and enough ability to do what you want to do.
TouchDesigner is unique because it can render content at almost any resolution, both high frame rates and low frame rates. Its network of nodes and hardware are directly connected, enabling seamless data flow and interaction throughout your project. It’s super customizable in that sense; you can connect to all kinds of hardware, DMX, Art-net, etc.
TouchDesigner is also capable of generating and rendering complex visual effects and geometries, making it ideal for sophisticated visual projects. By using components as modular building blocks, you can simplify complex tasks like rendering, controlling information, and generating geometry. Additionally, TouchDesigner facilitates the design of immersive, mixed-reality experiences, including augmented and virtual reality applications. And these features are not only unique, but also extremely powerful.
People approach TouchDesigner differently, each bringing their own unique backgrounds, workflows, and creative styles to the platform.
Now that we’ve explored what sets TouchDesigner apart, let’s look at some of the specific project capabilities you can achieve with this software.
I’m sure you’ve seen tons of projects where it seems like there’s a bunch of projectors or screens all being driven by a TouchDesigner system, and you think how could that even be possible?
One project idea in TouchDesigner is putting together a calibration interface for installations that require precise alignment of projectors or screens. TouchDesigner also enables the creation of immersive, 360-degree environments in museums and events through projection mapping.
The reason is that TouchDesigner can take tons and tons of video outputs and input devices. It can play as many videos and generate as much content as your computer hardware can support. The possibilities are truly endless.
With an understanding of what TouchDesigner can do, let’s see who can benefit from using it.
What brings a lot of people to TouchDesigner is interesting because there’s no one track to discovering it. Everyone approaches TouchDesigner differently, bringing their own unique style, workflow, and perspective to the platform.
It’s not just artists coming from a music background or those who do live shows, not just visual artists, not just UI people, not just architects or data scientists, but all different people from all different kinds of fields and disciplines. Users may operate the software in different ways depending on their background, utilizing various operations and techniques that suit their individual needs.
They all bring what they know to the table and are using TouchDesigner and its unlimited capacity to do really interesting things.
As we start learning the different parts of the software through our tutorials, you’ll see that it has so many built-in features, some of which you’ll think “who uses this?”. And that’s because there’s been so many different kinds of specialists, programmers, and creative coders that have asked for different features.
With such a diverse user base, TouchDesigner continues to evolve and expand its capabilities. Next, let’s explore the industry standards and tools that make TouchDesigner even more powerful.
Another really great benefit of TouchDesigner is its support for industry standards. The following protocols and formats are supported natively inside of the platform:
DMX
Art-net
OSC
HTTP
TCP
UDP and WebSockets
Spout
UDT
MIDI
RTSP video streams
TouchDesigner handles a wide range of inputs—including MIDI, OSC, video, and audio—enabling real-time visual manipulation, projection mapping, and reactive visuals.
TouchDesigner is widely used in industries ranging from live performance to high-end brand activations. It is especially popular for live visual performances and stage design, allowing artists to sync visuals with music for immersive experiences.
It’s also really great for cutting-edge hardware. When VIVE came out, TouchDesigner was one of the first platforms to get native support, and the same thing happened with Oculus, RealSense, Kinect 2, and Leap Motions.
Let’s say that there’s a piece of hardware or software that you want to talk to that isn’t already natively in there.
There’s so many ways that you can add functionality to TouchDesigner, whether it’s through Python and doing scripting and talking to different web platforms on your own, making C++ operators which allow you to develop your own nodes for very specific purposes, or you’re using GLSL, which is the GPU shading language. It’s all possible with TouchDesigner.
One thing that’s really good if you’re coming to TouchDesigner now, is that the pre-built set of tools are growing rapidly. Previously, there wasn’t really that much, so you had to build everything yourself, but now it’s getting to a point where you have a lot of tools for 3D projection mapping, similar to Mapamok from openFrameworks, as well as tools that are similar to MadMapper for doing 2D projection masking.
When setting up a rendering pipeline for projection mapping, you’ll often use a Render TOP to visualize geometry created with Geometry COMP operators, integrating with Light and Camera components for the final output. The Parameters panel allows you to configure operator properties like scale and position, making it easy to customize your workflow. Comp (Component) operators serve as modular building blocks, encapsulating functionality and enabling complex network structures.
These tools only scratch the surface of what’s possible in TouchDesigner, which enables real-time processing so you can modify projects while they are running and get instant feedback. TouchDesigner is widely used for real-time audio-visual outputs, including projection mapping, audio/data-reactive visuals, and augmented or virtual reality applications.
TouchDesigner’s also got a lot of tools for edge blending, grid warping, and talking to different API’s that can really help you as a beginner.
With these tools and integrations, you’re ready to start building your own interactive projects.
Surface Operators (SOPs) are a foundational part of TouchDesigner’s visual programming language, enabling users to generate, manipulate, and transform 3D geometry within their projects. SOPs allow creative developers to build everything from simple shapes to intricate models and dynamic environments, all within a node-based workflow.
By combining surface operators with channel operators (CHOPs) and texture operators (TOPs), you can create sophisticated, interactive systems. For example, a creative developer might use SOPs to generate a 3D sculpture, then use CHOPs to animate its movement in response to audio input, and finally apply TOPs to add realistic materials and textures. This seamless integration between different operator families allows for endless creative possibilities, letting you manipulate geometry, materials, and interactivity—all within the same visual programming environment.
Whether you’re interested in projection mapping, interactive installations, or generative art, mastering SOPs gives you the tools to create, generate, and modify complex 3D content as part of your TouchDesigner project.
Now that you understand the power of SOPs, let’s move on to learning strategies for mastering TouchDesigner.
TouchDesigner is a really powerful program, but it isn’t perfect, just like everything in life. It’s easy for a beginner user to hit optimization stumbling points.
TouchDesigner is amazing, but if you don’t really have the skills to push it, you could easily fall short and end up thinking to yourself, “Wow, this program is not effective and it’s really weak. How are all these other people able to get so much out of it?” (another important question).
The truth is it really comes down to your skills as a developer. You have to approach TouchDesigner with a real self-learning attitude. If you need quick answers, you can go straight to the docs/manual for straightforward guidance.
You can’t come to TouchDesigner and think that everything’s going to be served on a silver platter because a lot of the time you’ll be figuring out new tools and new ways to do things on your own. Having an attitude of self-learning, problem-solving and getting through challenges will really put you in the mindset to be successful.
Learning Python in TouchDesigner is highly recommended, as it significantly improves your ability to handle data and create dynamic visualizations. Using Python also opens up new opportunities for automation and customization, allowing you to create more complex and interactive experiences.
Our tutorials on here and videos on our YouTube channel will definitely help. If you need quick answers, you can go straight to the docs/manual for straightforward guidance.
With the right mindset and resources, you’ll be able to overcome challenges and make the most of TouchDesigner’s capabilities. Next, let’s discuss troubleshooting and optimization strategies.
As you develop more complex TouchDesigner projects, effective troubleshooting and optimization become essential for ensuring smooth performance and stability.
TouchDesigner provides a range of tools to help users identify and resolve issues, such as Debugging and Profiling features that let you pinpoint errors and optimize resource usage.
By leveraging these tools, you can quickly locate problems within your network of operators—whether it’s a misconfigured SOP or a bottleneck in your data processing pipeline. Profiling helps you understand which parts of your project are consuming the most resources, so you can make targeted improvements for better efficiency.
Additionally, Python scripting is a powerful way to automate repetitive tasks, streamline workflows, and manage large projects. By integrating Python, users can create custom tools, automate control panels, and enhance interoperability with other software and hardware.
Mastering these troubleshooting and optimization techniques ensures your TouchDesigner projects remain robust, efficient, and ready for live performances or installations—no matter how complex your creative vision becomes.
With these skills, you’ll be prepared to tackle any project in TouchDesigner. Alright time to wrap up and get this show on the road.
So, that’s an overview of TouchDesigner, why it’s so unique, and why it’s an amazing, worthwhile program to get into, whether you’re interested in live music visuals, fixed media works, fun particle systems, interactive installations, or just exploring all sorts of creative stuff.
In our TouchDesigner introduction series, we’re going to get started by looking at the basics—including core concepts like CHOP (Channel Operators), which are essential for generating and manipulating moving data streams. TouchDesigner enables you to create interactive installations that can react to visitor movement, touch, or sound, greatly enhancing user engagement. It’s also widely used for interactive art installations that respond to human presence through sensors.
First up is Mouse Controls!
I possess a deep knowledge in many professional fields from creative arts, technology development, to business strategy, having created solutions for Google, IBM, Armani, and more. I'm the co-founder of The Interactive & Immersive HQ. Yo!
Building off of previous Python workshops, this class aims to demystify a few of the elements often used when doing advanced Python development work in TouchDesigner. From using storage to writing your own extensions we’ll work through the several concepts that will help you better leverage Python in TouchDesigner for installations and events. From the conceptual to the concrete, by the end of the workshop you will have both worked with abstract concepts in the textport and created a functioning tool for saving presets.
Matthew Ragan
We all know user interfaces in TouchDesigner are hard. If you’ve taken our Perfect User Interfaces training you’ll know all the ins-and-outs of creating your own user interface elements from scratch. But what if you need a UI made quickly? What if you want to skip building your own UI pieces? Widgets to the rescue! Widgets are the new and powerful way to make user interfaces quickly and easily in TouchDesigner. What they lack currently in their customization, they make up for in speed of deployment and out-of-the-box features that are easy to access through their custom parameters. Combined with new features to TouchDesigner such as bindings, creating quick, scaling, and aesthetically-pleasing user interfaces is a breeze. .
Everyone has seen pictures of TouchDesigner projects with hundreds of operators and wires all over the place. Impressive, right?
No! In fact, the opposite is true. If your projects look like this, you’re seriously hampering your TouchDesigner installations – and your potential to consistently get high-profile gigs:
If you want to create large-scale installations or consistently work on projects in a professional capacity, you need a project architecture that is clean, organized, and easy to use.
The best project architectures – those used by the pros – are so streamlined that they make programming TouchDesigner look boring.
I share how to do this in my training, “TouchDesigner Project Architectures for Professionals.”
In “TouchDesigner Project Architectures for Professionals”, I give you my exact project architecture system – the same system that’s made it possible for me to create installations for Nike, Google, Kanye West, Armani, TIFF, VISA, AMEX, IBM, and more.
With my project architecture system at your disposal, you will:
We accomplish this through my 3 core project architecture concepts:
I’ve spent over 8 years refining my project architecture into an easy-to-implement, repeatable system that any designer can use. Once you learn my system, you’ll be able to take on projects you didn’t think you were capable of. You will also have the confidence you need to land better gigs and meet challenging client demands with flexibility and ease.
Want to level-up your TouchDesigner skills and create projects that can intelligently make content and generative decisions using weather and climate data?
How about installations that span forty-story high-rises that use Twitter posts to prompt generative designs?
Big clients – with big budgets – demand a level of immersion deeper than the use of Microsoft Kinect and Leap Motion interaction. They want to integrate social media, custom web apps and their own CMS to create interactive installations that bring people together in a way they haven’t experienced before.
In short, they want to use technology to become part of the broader conversation.
Fortunately for us, we’re able to deliver this level of immersion by integrating external data sources into our TouchDesigner projects.
The catch? Bringing external APIs into TouchDesigner can be challenging:
That’s why I created my latest training, “Join the Broader Conversation: How to Use External Data and APIs in Your TouchDesigner Installations”. Made for the complete Python beginner, the training provides you with everything you need to begin integrating external data sources with your TouchDesigner projects.
When you’re done you’ll be able to charge more and secure bigger projects than you would previously.
In this 1.5 hour video training (which includes example project files), we will:
Without any guidance, I’ve found that learning to integrate external data natively into TouchDesigner takes new designers between 20-40 hours – and that’s not including the trial and error phase that comes with implementing these concepts for the first time. Many people quit out of frustration.
Want to avoid spending $50,000+ on the wrong computer hardware?
Or having to look your client in the eye and say “I don’t know” when they ask why their shiny new immersive media installation looks like a stuttering, jaggy hot mess?
Then you need this training.
When I first started working with TouchDesigner in 2011, I thought the most valuable skill I had to offer was my ability to code beautiful interactive and immersive media projects for my clients.
While this IS important, I quickly realized that that what my clients valued most was my ability to create an installation that performed perfectly – no tearing, stuttering, judder, or any other issues. If you think this sounds easy, you haven’t been working with Touch long enough.
This is one of the reasons my clients pay me $1,500 per day.
When I first started, I encountered all the issues mentioned above. I overcame them with a combination of all-nighters, hiring the right (and expensive) experts, and in some cases, luck. I also wasted a lot of time and money.
With experience, I was able to preemptively solve for all these performance issues.
That’s why I created the “Creating Flawless Installations with TouchDesigner” training. Now you can benefit from my 7+ years of experience without having to make the costly mistakes I did.
After this training, you will have the confidence you need to deploy immersive design and interactive technology installations for big brands who pay top dollar for your skills. And you’ll be one of the select few individuals in this industry that know how to do what I do with TouchDesigner.
In this 1.5 hour video training (which includes example project files), we will cover:
Want to create large-scale video arrays and real-time LED facades that span high rises?
How about installations that use GPU particle systems, volumetric lighting, and multi-composite operators?
As lots of you know, this is all possible with TouchDesigner – sort of.
Out-of-the-box TouchDesigner is great when you’re just starting out. But as your interactive installations grow larger and your clients begin to want more generative and technical content, there are several challenges that arise and the cracks begin to show.
Problems typically fall into two broad categories:
When problems due to scale such as these inevitably occur, the standard TouchDesigner functionality and nodes only gets you so far. And it doesn’t take very long before you have to explain to your client that you’re unable to deliver what they’re asking for.
Lucky for us, we can leverage the code that powers a lot of TouchDesigner to create installations of virtually unlimited scale and technical possibility.
We do this by learning how to program GLSL Shaders. GLSL is the programming language on which many of the features of TouchDesigner are created even now.
When you understand how to apply GLSL to TouchDesigner, you’re effectively turning on “God Mode.”
That’s why I created my training, “Turn on God Mode in TouchDesigner with GLSL Shaders.” In it, I cover the following concepts:
TouchDesigner is the leading platform for interactive media and immersive design, and is used to create the world’s largest installations. Elburz Sorkhabi explores and explains concepts in TouchDesigner revolving around network optimization and performance bottlenecks.
The user interface (UI) is an integral part of any TouchDesigner installation.
Most clients want dynamic installations that they can control as needed, without consulting a designer or programmer for every change. This is usually through a control panel and UI they can access.
Even more important are user-facing UIs – think interactive panels, turntable additions for live shows, and customizable remote controls. This is what many clients have in mind when they decide to contract someone to design an interactive installation.
But if UIs are so central to TouchDesigner installations, why is it so hard to make them not suck? Most UIs slow down installations and break when you try and resize a component or add multiple pages. They’re also ugly.
So as always, I’m fixing the problem by providing a training.
In my latest 2-hour training, you will learn how to:
A great TouchDesigner installation needs a great user interface. Get the training you need to provide professional UI for top clients today.
Elburz deep dives on all the the inner workings of Python in TouchDesigner. This introductory course takes you from the very beginning of your Python journey and explains concepts that will create a powerful foundation for all your Python scripting in TouchDesigner.
Ever wonder how TouchDesigner pros work so fast? Ever see a friend or colleague do something and think “How did you do that??” Elburz puts together the top tips and tricks that everyone needs to know when working with TouchDesigner. Speed up your workflows and explore undocumented features across both the application and each operator family.
Want to level up your TouchDesigner skills and create dynamic 3D installations with interactive elements that can scale from single to multi-touch and virtual reality – all without changing anything about your setup?
Are you still trying to use 2D interactive hotspots and invisible UIs in your 3D TouchDesigner installations?
If this sounds like you, I’ve got good news and bad news.
The good news is that you’re not alone – this is how most designers start out (even some experts get away with it). It actually works okay if your 3D installations are static and the interactions are simple.
The bad news is you’re going to miss out on rich, dynamic and complex 3D projects. Anyone who has tried to create dynamic interactive 3D elements using invisible 2D UI hotspots to trigger interactivity has seen this firsthand.
Fortunately, TouchDesigner lets us use render picking to integrate 3D interactivity directly into our projects:
But render picking isn’t easy. It requires unintuitive Python scripting techniques. And to implement effectively, render picking assumes a deep understanding of TouchDesigner and the connection between instancing and multichannel manipulation of data.
It’s with this in mind that I created the “How to Create Multi-Touch 3D Installations Using Render Picking” training. In this training, I teach how you how to use Python to build native 3D interactivity directly into your 3D TouchDesigner installations.
In this training, you will learn:
The best is that I’m offering “How to Create Multi-Touch 3D Installations Using Render Picking” for $125.
Note: this training is the same content as the previous “3D Interactivity with Render Picking” training, but it has been upgraded and re-recorded. If you already bought that one, you already have access to this new one!.
Learning TouchDesigner can be difficult for anyone, no matter what background you have. With all the new terminology, hundreds of operators, and unique paradigm, new users can become overwhelmed and paralyzed. In this training, I take you on a 3 hour deep dive of TouchDesigner’s basic features, fundamentals, and walk you through small example projects to introduce you to the operator families. This course sets you up to take on any of the intermediate trainings available.
Everyone always complains about the wiki. It’s hard to use, that’s a fact. What about all those hidden tutorials? And how about gigs? Where are those? Blogs and videos, where can I find those? For the first time ever, this training compiles all the TouchDesigner resources available and guides you not just in finding them, but also how to find future resources.
Want to create TouchDesigner installations with objects that interact with each other, human participants, and the environment? How about 3D scenes with objects that respond to natural forces?
Whether you’re interested in the above or are just tired of your TouchDesigner projects looking like a video game from the early 90s, the answer is Physics.
Physics is the key to unlocking a new level of realism and natural interactions in your TouchDesigner installations. Put plainly, it brings a new level of immersive fidelity and consistency to interactive installations.
But getting physics right in TouchDesigner is an uphill battle:
You can spend days, weeks, or even months trying to learn this stuff. Or, you can gain an understanding of the fundamentals in just over 2 hours with my latest training, “Physics Fundamentals: Use Physics Like A Pro in TouchDesigner.”
In “Physics Fundamentals” I give you everything you need to start leveraging physics to create interactive and immersive TouchDesigner projects of the highest caliber.
In “Physics Fundamentals,” you get:
When you’ve finished “Physics Fundamentals,” you’ll be able to add physics – one of the most in-demand TouchDesigner skills – to your interactive and immersive media repertoire.
How many times have you been on a gig and been screwed over because you didn’t have a contract in place? How often have you wished you could properly negotiate or knew the finer points of what you were actually signing? In this workshop, you’ll learn about the most common types of contracts, what all the sections mean, and how you can change them based on your requirements. The included templates give you a great reference whether you’re just getting your career started or if you’re a seasoned pro and want to review your own contracts.
Everyone has had a client ask them to make something cool with a Kinect 2. Where do you being? What can you make? Will it be hard or easy? How do we combine the Kinect info with regular TouchDesigner work that we have to do. In this workshop, I introduce you to the fundamentals of using the Kinect 2. This includes initial setup, using the invaluable Kinect Studio 2.0, demonstrating the common uses of Kinect 2 in TouchDesigner, and then talking through many of the common hardware pitfalls when using a Kinect 2 for a project.
Have you ever used high-density geometry and models in TouchDesigner to create the visually jaw-dropping interactive installations of your dreams, but come up short? You’re not alone. Creating fully functional 3D installations that look amazing and let users interact with them in real time is a major sticking point along most folk’s TouchDesigner journey.
In fact, I’d say that it’s nearly impossible to get right without knowledge of one tool: GLSL.
When you understand how to apply GLSL, you can create 3D installations on a massive scale, work with high density point clouds using sensors, and manipulate complex geometry in real time for truly interactive, large-scale immersive projects.
Over the course of 1.5 hours, this is exactly what you’ll learn in “God Mode in 3D: GLSL For 3D TouchDesigner Installations”. Through real-world examples and instruction, I give you the tools you need to begin working with GLSL in 3D today.
Note: We touched on the basics of GLSL with a focus on 2D work in a previous training, “Turn On God Mode in TouchDesigner With GLSL Shaders”. If you’re new to GLSL, I highly recommend you click here to get that course, and view it before viewing “God Mode in 3D”.
Here’s exactly what you’ll learn in “God Mode in 3D”:
For many, leveraging GLSL in TouchDesigner is the most critical step towards becoming a professional TouchDesigner developer. It’s one of those skills that separates the amateurs from the pros.
Fortunately, it’s a skill that can be acquired relatively easy with practice and the guidance provided in “God Mode in 3D”.
SOPs are tough, there’s no getting around that, but they aren’t impossible. What most people lack is a fundamental understanding of how SOPs work and the data structure that drives them. With this knowledge in hand, it’s possible to do great things with SOPs. In this training, Elburz takes you from SOP ground-zero through to making some SOP data visualizations and particle systems with attractors and metaball forces.
Getting gigs can be hard. Even something as simple as figuring out the budget can be a challenge. Whether your new to the industry or a seasoned pro, there are many factors to consider in pricing. To add even more on your plate, once you have a price, you still have to put together a nice presentation to pitch the project. In this workshop, I take you through the common process of pricing and pitching a gig to win it as quickly as possible.
Machine Learning (ML) completely transforms the capabilities of TouchDesigner.
In fact, it might be the single most important development for interactive tech and immersive media in years.
Why?
Well, most TouchDesigner developers are used to standard computer vision, which requires you to program very specific rules for every bit of data your installation ingests. If the data varies even slightly, the rules must be reprogrammed, or the installation can break.
With ML, a new relationship between data inputs and their outcomes is created. Instead of programming a set of specific rules, large datasets are fed to your computer that “train” it to understand it’s environment.
For example, without ML it’s almost impossible to get your TouchDesigner installation to recognize faces of people with hats, glasses, or beards, because there are just too many variations to create rules for. But with ML, you can train your installation to recognize what a face is by having it learn from millions of images of people.
And this is just the tip of the iceberg. From realistic landscapes generated using millions of data points, to style transfers that look just like a Monet, to near-limitless skeleton tracking, ML blows open what is possible with TouchDesigner.
But like most things interactive and immersive, it’s not that easy…
To solve these problems, I created the training “Machine Learning For TouchDesigner.” In it, I demonstrate how to leverage ML to the fullest using TouchDesigner and a program called Runway ML.
For those unfamiliar, Runway ML is an application that allows you run ML models both locally and even on their own Remote GPU cloud resources that eliminates the need for you to have custom software or hardware to leverage machine learning.
I love Runway ML so much that I’ve been collaborating with the co-founders on educational materials, and they were generous enough to offer anyone who purchases this course a $20 coupon code for remote GPU processing, which equates to over 6.5 hours of processing time.
Here’s exactly what you get in “Machine Learning For TouchDesigner”:
By the end of “Machine Learning For TouchDesigner”, you’ll have everything you need to leverage machine learning in your TouchDesigner installations immediately.
Prerequisites: To get the most out of this course, you should already have a good fundamental understanding of TouchDesigner, as well as Python and how it is used inside of TouchDesigner. We recommend our TouchDesigner 101 and Python 101 for TouchDesigner courses.