
Back in 2018, Elburz put together a popular article covering some useful tricks for TouchDesigner beginners to add to their ever-expanding toolkit. Most of the techniques covered are as relevant as ever, but TouchDesigner has continued to evolve since that time, introducing many new features and workflow improvements. As TouchDesigner and the community around it continue to grow, we thought that now would be a great moment to revisit the article with some updates on the techniques, while adding a couple of new ones into the mix. So, without further ado, let’s take a look at some TouchDesigner beginner tricks and custom parameters you should know!
TouchDesigner Beginner Tutorial Series
If you’re a TouchDesigner Beginner, check out our TouchDesigner Tutorial Series!
We teach you all the basics of how to use TouchDesigner, including mouse controls, hotkeys, parameters, the operator families, and more.
1. TouchDesigner Custom Parameters
Although now a familiar part of the TouchDesigner ecosystem for seasoned developers, custom parameters are still a great tool that beginners will benefit from knowing. They’re used all the time to wrap more complex functionality inside of a component with some exposed parameters. You’re not just limited to a few types of parameters, either — any kind of parameter type already available in TouchDesigner can be used for your own custom components.
One thing to note: custom parameters can only be added to components. Any component can have custom parameters added, but they are most commonly used with the Container COMP and Base COMP.
How to Use TouchDesigner Custom Parameters
To get started, add a Container COMP to the network , and then right click on it and select Customize Component. This will pop up a new window called the Component Editor.

The first thing you’ll want to do is make a new parameter page by clicking inside the field to the left of the Add Page button and typing in the name of the page. I usually use something like “Settings” or “Controls”. Once you’ve entered the name, click Add Page. If you look at the parameter window of your component, you’ll see a second row now where your custom parameter page lives. You can click on it and it will be blank for now.
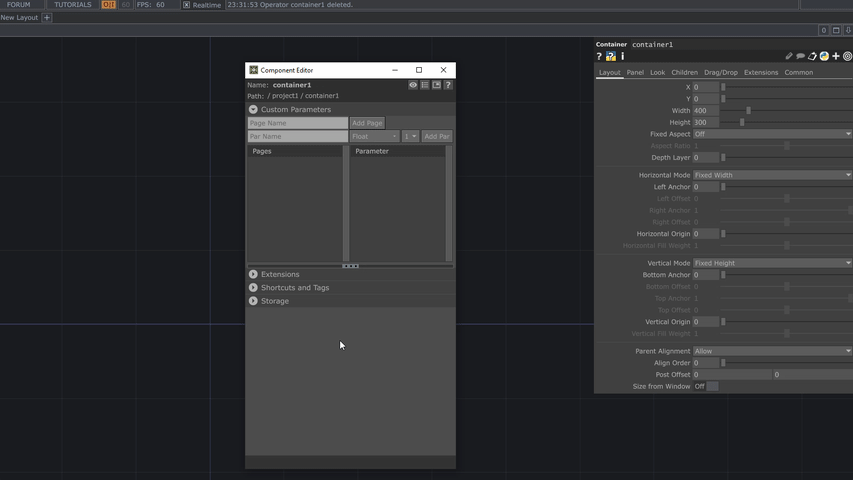
Now you can select the new parameter page on the left side of the Component Editor and begin adding new custom parameters to it. Directly below where we just entered the new Page Name, you’ll see a text field labelled Par Name, which is what you’ll use to give your new parameter a name. The drop down to the right of the parameter name field allows you to choose from one of the many types of parameters in TouchDesigner. This ranges from pulse buttons, toggles, to colour pickers and asset selectors that will pop open a Windows explorer window. The drop down to the right of that is a number between 1 and 4, which denotes the amount of values to add to a single parameter for parameters such as Floats or Ints. If you select Int and select 3 from that drop down, you’ll create an integer with 3 parts to it.

Let’s make a simple Toggle for now. Select Toggle from the drop down and give it a name and click Add Par. Once you do that, you’ll see the new toggle button added to the parameter page you created.

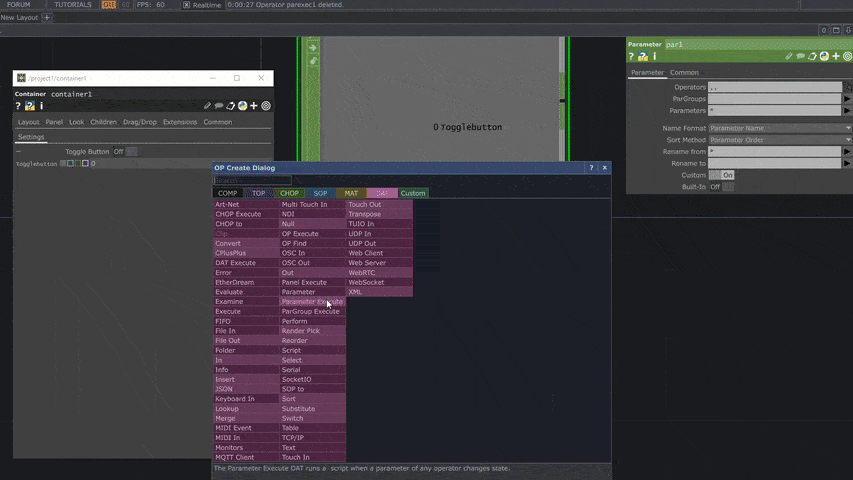
Accessing this value is extremely easy. Go inside the component and create a Parameter CHOP. By default, it will only pick up custom parameters and you’ll see a single channel with the same name as your custom parameter. You can go ahead and connect this channel to anything you would normally use a TouchDesigner CHOP channel for, but in this case you also have created a custom parameter that controls it.

Most of the channel based operators can be accessed through the Parameter CHOP, but all of the data parameters (such as file paths or strings) need to be accessed through the Parameter DAT. It works like many of the other callbacks in TouchDesigner in that it has different functions where you add your code based on triggers. To access our same toggle button via the Parameter DAT we would add something like this under the onValueChange() callback:
if par.name == "Togglename":
    print(par.eval())
This would parse the different customer parameters by name, find the toggle parameter by it’s scripting name (the name written in the box in dark grey when you hover over a parameter for a few seconds), and then prints its current value. Check out the next GIF for a quick rundown of the process!
2. Parameter Binding
Beginners may be familiar with the commonly used Constant, Expression and Export parameter modes, but there’s also another option: Bind mode! Introduced back in the 2019.10000 series, binding links the values of two or more parameters together. This means that changing the value of any one of the parameters will change all of them. This can be very useful when working with custom parameters, as it allows you to modify settings at the operator level within the COMP, while updating the custom parameter’s value and without breaking the reference to the custom parameter.
When working with binding, you’ll have a bind master, which is the value at the top of the chain (and where the value is actually stored). A bind reference is a parameter that is actually set to the fourth bind parameter mode, and uses a bind expression which resolves to the bind master. It will appear as purple text in the parameter window.
There are a number of ways to set up binding, which might be somewhat familiar if you’ve worked with expressions or CHOP references. Here are some of the options:
- Manual Expression Entry: Set the parameter you want to be the bind reference to the bind mode, and then enter a bind expression that points to the bind master, like op(‘lfo1’).par.phase. Note that you’ll need to enter this expression in the lower entry field (accessed by expanding the parameter), because the upper text entry area is used for changing the parameter’s value.
- Using a Python Script: You can set the bind expression of a parameter with the format Parname.bindExpr = string.
- The Drag & Drop Method: Binding between parameters can be set up by dragging. Click and drag the parameter’s name that you want to be the bind master onto the parameter name that you want to be the bind reference.
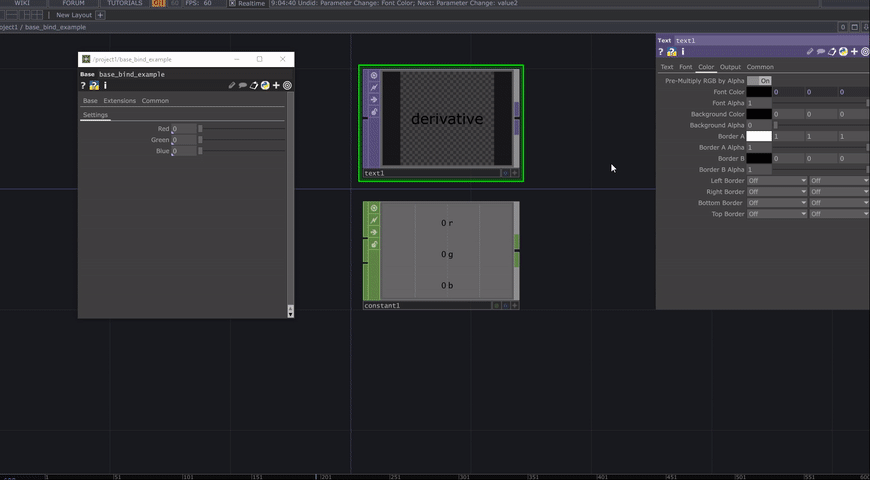
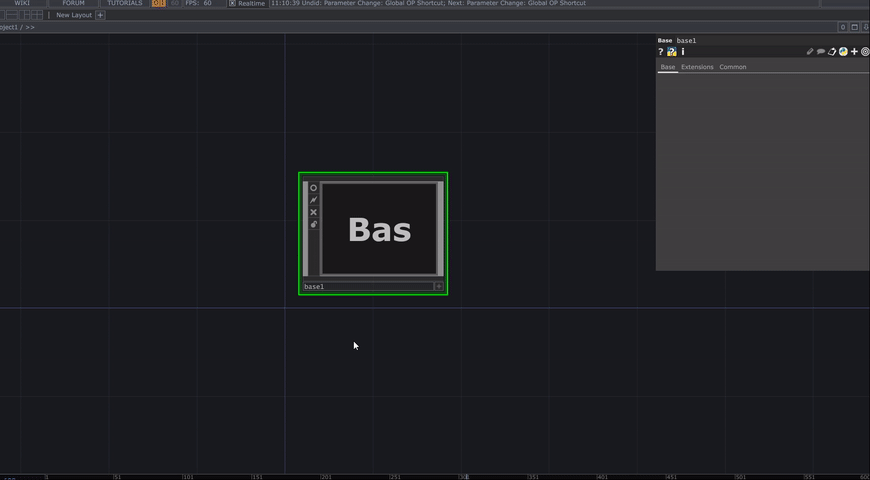
Since the dragging method is quick and easy to set up, we’ll use it as the basis of the example below. In this example, we’ve set up a Base COMP with three custom float parameters named Red, Green, and Blue. Inside the Base COMP, we’ve added a Text TOP and a Constant CHOP.
In the first step, we use the drag method to bind the three channels of the constant CHOP to the custom parameters of the Base COMP. In this case, the Base COMP’s custom parameters are the bind master, while the Constant CHOP parameters are the bind reference.

Next, we use the same method to set the font color parameter of the Text TOP as a bind reference to the Base COMP’s custom parameters.
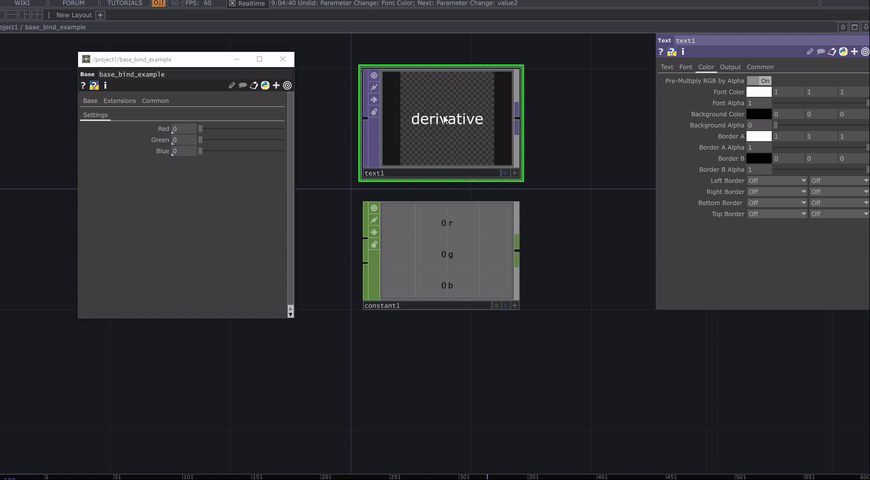
Now that the bindings are set up, we can adjust the settings from the parameters of the Base COMP, the Constant CHOP or the Text TOP, and the settings will immediately update in all locations, without breaking any of the connectivity! This can be a great tool to utilize when you’re building out functionality in a TouchDesigner COMP and want to make sure any tweaks that you make are reflected in the custom parameters of the parent.
3. TouchDesigner Editor Start Position
When working on installations with huge displays or multiple kinds of displays, it can be tough to setup your working environment. In this trick, we’re talking specifically about the network editor, which by default opens up and fills the whole main screen. If you’re using something like NVIDIA Mosaic, your whole screen could be any setup or number of screens connected to a single system. If you let TouchDesigner fill up a whole window, it might be too big or it might be too small or it might be covering the wrong screens that you want to work on. Luckily for us there’s a way to set a custom start position and size of editor window. To set this up, go to the Dialogs menu at the top of the screen and choose Window Placement. The bottom portion of this window contains the settings for the network editor. In situations with lots of screens or large setups, the Custom mode comes in handy. When selected, the Custom Position settings in the bottom right corner will activate, and you can set the X and Y position (in pixels) as well as the size of screen. Now you can setup your work environment and not have to worry about resizing the network editor every time you open TouchDesigner!

4. Operator Snippets
A very useful resource as a beginner learning your way around TouchDesigner and specifically what you can do with all of those operators are Operator Snippets, or OP Snippets for short. This is a collection of over 1000+ live examples of TouchDesigner operators in use, which can be copied and pasted into your network.
There are a couple of ways to access the OP Snippets:
- Right-click on an existing OP in your network and select Operator Snippets…*
- Right-click on an operator name in the OP Create dialog and select Operator Snippets…*
- Via the Help menu ➠ Operator Snippets.
*One important thing to note is that not every operator has an OP Snippet at this point. In this case, the Operator Snippets option will be disabled and greyed out in the right-click menu.
Let’s take a look at a quick example. Say you have the following network, which contains a Constant CHOP and a Rename CHOP, and you don’t quite understand how you can utilize the Rename CHOP within the network. Right-click on the Rename CHOP and click Operator Snippets… After a few moments of loading, you’ll be greeted by the OP Snippet for the Rename CHOP, which showcases how you can use pattern matching to rename channels.

While we’re here, take a look around the OP Snippets window. You’ll see that on the left there’s a very similar menu to the OP Create dialog, allowing you to look at snippets organized by operator family. Below that section, you’ll see a second section with buttons which are labelled “rename patterns” and “check select”. These are the example networks available for the Rename CHOP. Different operators will have varying amounts of examples, ranging from just one to ten or more.
If you pick a different example, the whole network on the right hand side of the screen will change to show you that example in action. The text just below the example buttons will also change to give you some more info about the current example. The design of the OP Snippets window allows for fast browsing of examples, making it very easy to click through tons of different operators and learn about their functionality in more detail.

The best part about OP Snippets is that they are made of real running examples. You can see the example running in real-time, you can update it or play with it in the OP Snippets window, and most importantly, you can copy and paste it into your own project to continue using it. How helpful is that?
One final thing that a lot of new users miss are the Python examples. There is a simpler version of the Operator Snippets that exists for Python. To access this you go to the Help menu at the top of the screen and select Python Examples. This will similarly open up a new project with a bunch of different components that house many different real Python examples that you can experiment with to learn from. The Python Examples window is shown below.

5. Delay Scripts
There are two methods of introducing delays in Python scripts. The first is the one most developers who’ve been using Python know; that is by splitting up their scripts into multiple Text DATs and then using something like:
op('text_dat_name').run(delayFrames = 30)
This would run the next script in 30 frames. At 60 fps, this would run 0.5 seconds later and at 30 fps it would run 1 second later. But what if you need to delay a bunch of quick single line commands, things like clicking on buttons or setting slider values or anything like that. It becomes a huge pain to start making new Text DATs with single lines in them like:
op('button_name_here').click(1)
That doesn’t need a whole Text DAT to itself! This is where inline delays come in hand using the runs class and the run class (I know… they’re very similarly named…). The runs class holds a bunch of run commands, but that’s besides the point. How do you use it? Easy.
Let’s say you have a button named button1 and you want to click it 1 second after a print statement and you have slider named slider1 and you want to set it’s value to 0.5 another second after the button gets clicked. Instead of making a new Text DAT for each of these actions you can do something like this:
run("op('button1').click()", delayFrames = 1 * me.time.rate)

run("op('slider1').interactMouse(0.5, 0.5, left=True)", delayFrames = 2 * me.time.rate)
Just like that you can add the delays to the scripts right inline next to each other without needing to make new Text DATs. The way this works is that you give it a Python command as a string (that means inside a pair of quotation marks), and then you can give it a delayFrames. You’ll notice in this example I used a trick where instead of specifying the amount of frames to wait, I calculate it by multiplying the time in seconds I want to wait by me.time.rate. This means that if I wanted something to wait for 1 second, it wouldn’t matter the frame rate, it would always calculate the correct amount of frames to wait. One thing to be aware of with this method is you use of double and single quotations marks. I usually wrap my whole statement in double quotation marks (“) because I prefer to write my Python statements with single quotation marks (‘) to denote strings.
You could take it a step farther and feed in variables that are your Python strings, such as:
script = "op('button1').click()"

run(script, delayFrames = 1 * me.time.rate)
This is an overly simple example, but it shows you that you can compose the Python expression as a string separately and then just feed the variable to the run command. Since it’s just a string you can also do things like inject variables using string concatenation amongst many other things.
6. Override System Hotkeys
This is a “feature” we’ve been using more and more recently. It’s very useful when you have projects that have a lot of keyboard usage while you’re still editing in the network editor. It’s also useful if you plan on creating some new hotkeys for a specific project. System hotkeys include everything from space bar that pauses and plays the timeline, all the up to hitting ‘b’ to bypass/unbypass operators. To get access to these hotkeys, you need to use Windows explorer to get to your TouchDesigner installation path (by default C:/Program Files/Derivative/TouchDesigner[VersionNumberHere]). When here, enter the Config folder and you’ll see TouchShortcuts.txt. This is the file that you want to edit. Open it in your favourite code editor (like Sublime Text) and you’ll see it is a tab separated file with the first column being the command, the second is the key, and the third is the command. Before going any further:
Be aware that hotkeys may be set back to default if you upgrade your build and they only apply to your computer, and not just one project file. You also might create an issue with your TouchDesigner installation. So make a backup of your hotkeys file before you begin editing anything.
With that out the way, you’ll see all of your favourite shortcuts listed here. For example, if we wanted to remove the space bar hotkey that pauses the timeline, you can find this line (near the top):
general.pause space space
and delete it. If you reopen TouchDesigner, you’ll find the space bar won’t impact your timeline anymore and can be used for other hotkeys or for your own programming needs. If you’d like to change a hotkey, you need to find the key that you’d like to replace and enter a new key for it. It’s a bit of uncharted territory and you’ll learn more by just looking around as I don’t know of any documentation for this. If you wanted to mess with someone you could find the lines:
network.dive   i

network.jump.up   u
which control the very familiar TouchDesigner hotkeys to move in and out of components. You could switch these hotkeys around to:
network.dive   u

network.jump.up   i
and save the text file. This would flip the buttons and cause some serious confusion for whomever was going to use the system next!
Get Our 7 Core TouchDesigner Templates, FREE
We’re making our 7 core project file templates available – for free.
These templates shed light into the most useful and sometimes obtuse features of TouchDesigner.
They’re designed to be immediately applicable for the complete TouchDesigner beginner, while also providing inspiration for the advanced user.
7. Global Operator, Parent, and Internal Operator Shortcuts
Shortcuts are a great way to access important data from different areas of your network. As you work on larger and larger projects, you’ll begin to realize the need to organize and compartmentalize all the different areas and features of the installation you’re building. With this organization and compartmentalization, it’s pretty common to end up with many nested layers of components, which themselves contain important data operators that you need to access from many places within a project. The network paths of these operators can be very long and difficult to remember. Shortcuts are a super convenient way to get simple, direct access to the components you need without having to traverse the complex project hierarchy.
We’ll be looking at three different kinds of shortcuts, the Global OP Shortcut, the Parent Shortcut, and the Internal Operators Shortcut.
Global OP Shortcut
Global Operator shortcuts help you access any component from any operator. Global OP shortcuts can only be assigned to components. All you need to do is to provide a name for the COMP’s Global OP Shortcut parameter, and you can then access it from anywhere in the network via the shortcut op.ShortcutName. Let’s take a look at a quick example.
After adding a base COMP to the network, we give it a new name and then set the Global OP Shortcut parameter to shortcutOP. After that, we collapse the network several times, so that the original base COMP is now located at /project1/base1/base2/base1/base_global_op_ex. Pretty long network path, right?

Next, add a Select COMP to the network, which we’ll use to access the original Base COMP. By using the expression op.shortcutOP and changing the parameter mode to Expression, the expression is evaluated and results in the full network path to the COMP! It’s really that simple. If you wanted to access an operator inside of op.shortcutOP, you could use the expression op.shortcutOP.op(‘nameOfOP’).
The best part about this link is that it’s dynamic. It doesn’t matter where you move the component to, your paths will not need updating or fiddling, everything will keep working as is.
Parent Shortcut
In certain situations with nested components like we saw in the previous example, you’ll want to access parent COMPs that are up a few levels in the network hierarchy. As things get complex, it can be difficult to remember how many levels up you need to go to access the right operator, and that’s where parent operators come into play. To access a COMP via its Parent Shortcut, you can use the expression parent.ShortcutName.
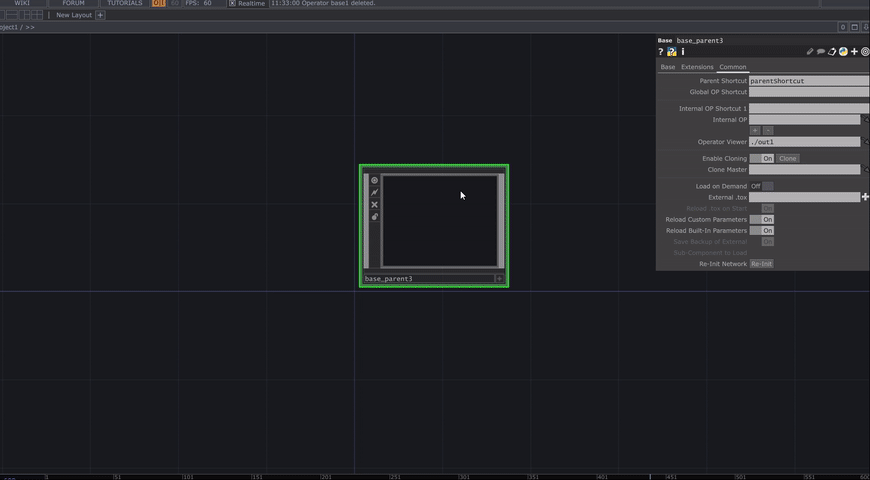
For example, let’s say you have three nested Base COMPs, base_parent3, base_parent2, and base_parent1. base_parent3 is at the top of the hierarchy, so the path to base_parent1 is base_parent3/base_parent2/base_parent1. Inside of base_parent3 I’ve placed a Movie File In TOP, which we want to be able to access within base_parent1.

Next, we enter “parentShortcut” for the Parent Shortcut parameter of base_parent3.

With that done, we head back to base_parent3/base_parent2/base_parent1 and add a Select TOP. For the TOP parameter, we enter parent.parentShortcut.op(‘moviefilein1’), which will first give us the path to the base_parent3 COMP where we made the shortcut, and then find the operator moviefilein1 within it. Set the parameter mode to expression, and the full path appears!
Internal Operator Shortcut
Last but not least, internal operator shortcuts. What if you need to access an operator within one of your COMPs frequently, and don’t want to type out something like parent.parentShortcut.op(‘moviefilein1’) as we did above? Internal OP shortcuts provide the perfect solution! We can assign a shortcut to a specific operator (note I did not say COMP) within the component for easy access. In this case, you can access the operator via the shortcut iop.ShortcutName. Like the Parent Shortcut, this will only work inside of that particular COMP and not from anywhere in the network.
Let’s use our previous network setup from the Parent Shortcut example again. This time, we’re going to set an iOP Shortcut for the moviefilein1 TOP with the banana image. For the Internal OP Shortcut 1 name, we use banana and then enter ./moviefilein1 for the Internal OP.

With that, we can head all the way back down to base_parent1 and change the expression of our TOP parameter to iop.banana and receive the exact same network path as before — but with way less typing required!

One final thing to note — you can add multiple iOP shortcuts per COMP, so you can have easy access to many important operators!
Wrap up
We hope that these *newly updated* quick tips and tricks help you add to your own toolbox of useful TouchDesigner techniques, regardless of your experience level. Enjoy!
