
Intro: TouchDesigner & GIFs
If your daily browsing includes websites like Giphy (or one of the similar GIF hosting/searching/sharing sites), Twitter, Tumblr, Reddit, forums or a good old blog, then you’re no stranger to the GIF image format. Let’s say that you’ve just made a super cool visual in TouchDesigner and are interested in sharing it on one of the above sites as a GIF. If you’ve spent any time with TouchDesigner, you’re probably thinking: I bet I could use TouchDesigner to export GIFs, right?
Well, you’d be partially right — TouchDesigner does indeed include the ability to export GIFs natively. However, it is limited in its GIF creation capability and not necessarily the best method for turning your amazing generative graphics into GIFs to share with the world. In this article, we’ll dive into your options for turning your TouchDesigner visuals into GIFs.
Using the Movie File Out TOP for Exporting GIFs
As mentioned above, it is actually possible to export GIFs directly from TouchDesigner, via the Movie File Out TOP. In some cases, this will produce acceptable results, but it doesn’t offer much in terms of tweaking or optimizing the output. More often than not, you’ll end up with very high file sizes (which as we’ll see in the next section is important to limit for web use), and no adjustable parameters to alleviate the issue.
In some cases visual artifacts may also appear in the output, like those seen in the image sequence below.

With these pitfalls in mind, it’s almost always better to export the TouchDesigner content to a video file first, and then use another software to convert the video to a GIF.
Before we cover exporting from TouchDesigner, let’s go over GIF specs so that we can set our network up appropriately.
What makes a good GIF for web?
Since the intended output for our GIF is the web, we’re going to use some recommended specifications to ensure it’s web friendly.
Both image resolution and the total number of frames play a role in how large the final file size is, which is an important consideration. Smaller GIF file size means faster load time — and thus less waiting around for your amazing graphic to load. This is especially important on mobile devices.
In general, it’s best to:
- Keep the file size below 5MB.
- Reduce the image resolution – no 4k resolutions here! Giphy recommends 720p (1280×720) max for your source video, but 480p is even better.
- Minimize the total number of frames. Giphy recommends a max of 200 frames, but 100 frames or less is even better.
Higher frame rates (> 30 FPS) are going to make it harder to meet our target file size, so we’re going to export at 30 FPS. If we’re thinking in terms of a 30 FPS video, 6 seconds of video is the same as 180 frames, and 3 seconds of video is 90 frames.
Exporting the GIF From TouchDesigner
Cool, so we now know how our final GIF specs should look, but what about TouchDesigner?
Although we’re not going to be using TouchDesigner to create our GIF file, we do of course need some content to convert into a GIF! Now’s the time for you to experiment and create some amazing generative visuals to export. For this example, I’ll be working with a super simple Noise TOP animation.
Once your network is ready, take into consideration the resolution suggestions from before. Is your output resolution larger than 720p (or even 480p)? Consider scaling down your output resolution to something smaller. I found that even 512×512 produced pretty large GIF file sizes for my noise animation, and ended up setting the Noise TOP to output at 350×350.
Modifying the resolution to something smaller before you export/convert to a GIF will likely lead to better results, because it will avoid introducing artifacts by rescaling/recompressing the GIF later.
Next, we want to make sure that we’re working at 30 FPS in this case. Set the project’s FPS to 30.

Then, add a Movie File Out TOP and a Timer CHOP. We’ll be using the Timer CHOP to control the Movie File Out TOP’s record button, so that we only record a specific number of frames.
We’ll modify the Timer CHOP first. Set the length units to Frames, and then set the length value to 100. This will record a video with 99 frames. Feel free to modify this length value later if you want to record a shorter or longer clip.

Then, head to the Outputs page. Here, we’ll turn the Ready and Done switches off, and then turn the Running switch on.

Next, let’s head to the Movie File Out TOP. Here, we want to set our Video Codec to MPEG 4 (Part 2), turn on Unique Suffix (so you can record multiple takes) and modify the name under the File parameter.

Then, make a CHOP reference from the “running” channel of the Timer CHOP to the Record switch in the Movie File In TOP.
We’re just about ready to record our output! One important final step is to turn the Realtime switch off.

With that, we can start recording! Hit Start within the Timer CHOP and watch as the Movie File Out TOP does its thing.

Get Our 7 Core TouchDesigner Templates, FREE
We’re making our 7 core project file templates available – for free.
These templates shed light into the most useful and sometimes obtuse features of TouchDesigner.
They’re designed to be immediately applicable for the complete TouchDesigner beginner, while also providing inspiration for the advanced user.
Converting to GIF
For converting our newly created MP4 file to a GIF, we are going to use the very handy website ezgif.com! We’re using a website as it’s super quick to use, platform independent, and doesn’t require any extra software installation. FFmpeg is also an alternative here, and has many options available for video conversion, but to keep it simple we’ll leave that for another article.
Head to ezgif.com. You should be seeing the page below.

Click on the “Video to GIF” link and on the next page, browse for the MOV file you just exported from Touch, and then hit the Upload button.

Once you’ve done that, you’ll be presented with the Video to GIF converter page. On this page there are a number of options for modifying the video, including the start and end points, the size, and the frame rate.
For the size parameter, pick an option that works best for your final resolution. As my file was 350×350, I left it on the default “Original (up to 600px)” mode.
You’ll notice that there are actually quite a few frame rate options, not all of which will look familiar. The range of options here enable you to try different rates if you need to reduce the file size. Note that rates lower than ~24 FPS may look choppy, depending on your content. For our purposes, we’re going to use 25 FPS. Once you’ve got that set up, click Convert to GIF.

After a short pause you should see your newly created GIF! We can now add additional optimization to further reduce the file size. Click on the Optimize icon.
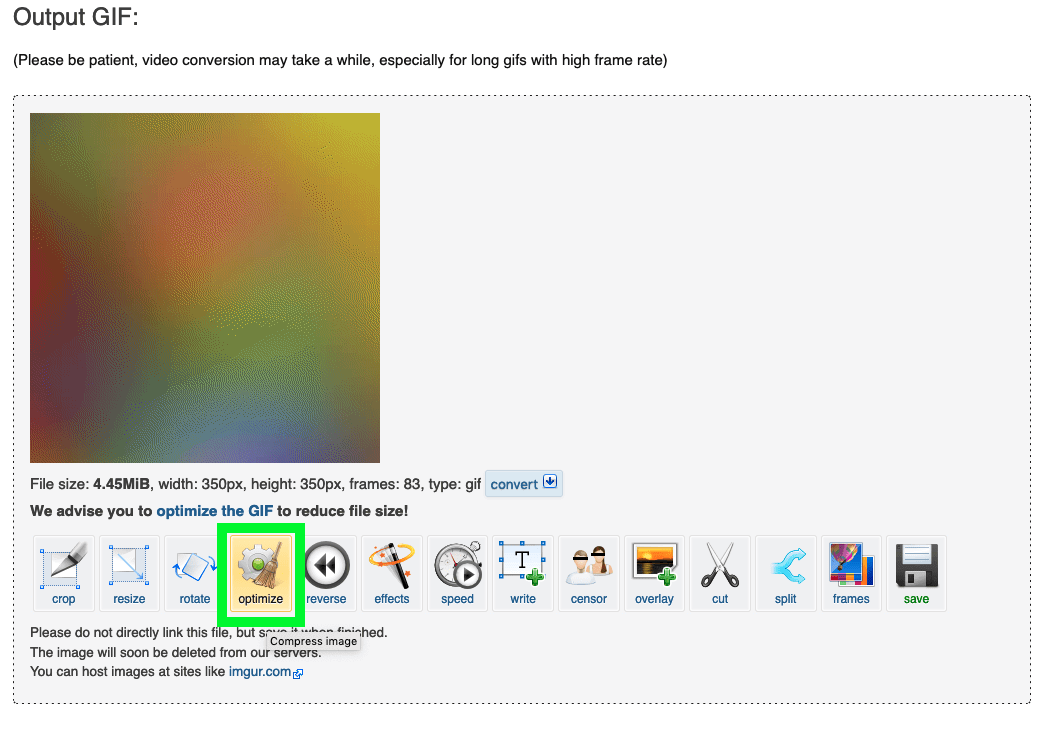

On the next page, we can begin by leaving the settings at their default. This will apply compression that should reduce the file size, without too much of a noticeable drop in image quality. Click Optimize GIF. After a short pause, you should now have a newly optimized version of the GIF! In my case, this reduced the file size by 44% without too much of a noticeable drop in quality. If your file size looks good, click save. You’re all set!

If you’re still not within the < 5MB range, try increasing the amount of compression. Note that the more compression you apply, the more artifacts will be introduced to the image.
If that doesn’t work, you might try the following:
- Re-export the original video at a smaller resolution
- Shorten the length of the original video
- Try reducing the frame rate in the initial GIF conversion
One final thing worth noting is that GIFs can only represent a maximum of 256 colors, meaning that you will see color banding in certain cases. A technique called dithering can be applied to smooth out the sharp transitions between colors. To apply dithering, change the optimization method to “Color Reduction + dither” and hit Optimize GIF.
That’s it! Now you can generate your own GIFs from TouchDesigner visuals and share them across the web.
Wrap Up
Whether you’re looking to share your digital art content on any number of social media platforms, forums, a personal blog, or text it to your mom, animated GIFs are a convenient and widely supported format for short animations. Although not a completely TouchDesigner-centric workflow, with the help of some simple external tools, your TouchDesigner creations are easily transitioned into the world of GIFs.
