For some, MIDI is a thing of the past and a protocol you’ve likely not touched in years. For many developers, especially those working with artists, music equipment, or other sound-focused softwares, MIDI is still one of the go-to staple protocols to use. A recent question in The HQ PRO was about how to load and playback MIDI files directly inside TouchDesigner and in this post, I’ll show you an easy way to do just that!
MIDI In TouchDesigner: CHOP
The first step in the process is to use the MIDI In CHOP! Surprisingly for most people the same CHOP that allows us to interface with live MIDI hardware is the same operator we use to load a full MIDI file.
If you need a sample MIDI file for this test, here’s a quick one I created so you can follow along with this example:
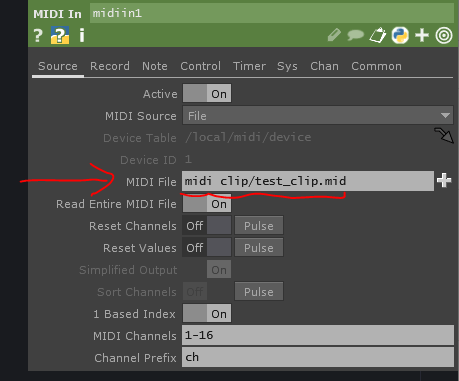
Our first step is to change the MIDI In CHOP to “file mode.” With a new MIDI In CHOP we need to change the MIDI Source parameter from Device to File:

The next thing we’ll want to do is point the MIDI File parameter to point at our sample MIDI clip:
Once we’ve done that we’ve essentially loaded our full MIDI file, but we aren’t seeing much data in the CHOP viewer! This is because we have to actually tell the MIDI In CHOP what to look for and what channels to look for the data on.
Isolating and extracting the right data
By default, I find the selections to not be particularly useful and they take a bit of fine tuning. The first place to start is isolating the correct MIDI channels. We can see in the image above, by default it’s reading and loading 16 channels of MIDI in. Based on what your MIDI file contains, you can update this to match where your data is. In the case of our sample, everything is contained in MIDI channel 1, so we can set the MIDI Channels parameter to 1:

When we do that, we will immediately see a lot less info. The only info we see here is ch1c8 channel and a ch1n60 channel. The naming convention for this is the ch tells you the MIDI channel, then the second letter tells you what type of data it is. c is for control change, n is for note values, etc. All of these can also be customized in the parameters but for standardization, I tend to leave them as is. So already we see note 60 has some pulses in it for where that note goes on and off in the clip. Where are all the other notes though?
If we navigate to our Note page of parameters, we’ll see that the Note Scope is set to 60. This is useful if you know exactly what notes you want to capture and this being set to 60 is why we only see ch1n60 in our CHOP viewer. We can alternatively set this to * which will mean that every MIDI note will be read into the CHOP. Once we do this we’ll see a lot more channels active:

Most of your manipulation of the MIDI file reading will come from doing this process of going through the parameters and making selections about what data you want to pull out. The MIDI clip also has pitch bends and mod wheel movement in it, so let’s pull that data out as well. We can see on the same Note page of parameters have blank parameters for pitch wheel, so let’s enter something like pw to this parameter, which will then reveal our pitch wheel channel in the CHOP viewer:

We can do something similar to reveal our mod wheel data. If we go to the Control page of parameters, we can see the selection here is set to By Index Only. Similarly to before, we can either change the value from 7 to *, which would reveal ALL control channels available or you could use the Controller Type parameter to Modulation Wheel which would just isolate that specific channel:

For this example MIDI clip, this will now retrieve all of our note data, our mod wheel, and our pitch bends! So the only thing left is figuring out real-time playback!
Get Our 7 Core TouchDesigner Templates, FREE
We’re making our 7 core project file templates available – for free.
These templates shed light into the most useful and sometimes obtuse features of TouchDesigner.
They’re designed to be immediately applicable for the complete TouchDesigner beginner, while also providing inspiration for the advanced user.
Play it back
The setup we’re going to use here is one that I use all the time. It involves a Timer CHOP to give us an index fraction between 0 and 1 that represents time passing and a Lookup CHOP that reads the data out of the MIDI In CHOP. I’ve talked about this setup before in the blog post below:
So let’s create our Timer CHOP and Lookup CHOP and get them wired up:

Then let’s configure out Timer CHOP. The first thing we’ll do is disable the extra channels we don’t need. Go to the Outputs page of parameters and turn off everything except for Timer Fraction:

Then the last thing we have to do is tell the Timer CHOP how much time to run for. You could set this manually if you like by middle clicking on the MIDI In CHOP and checking how long it is, but in this case we’ll make this a dynamic reference so if we update our MIDI clip our timer will automatically update it’s playback length. To do that, let’s add this expression to the Timer CHOP’s length parameter:
op('midiin1').numSamples / me.time.rateThis will look like this:

This is a really simple Python expression that checks the number of samples inside of the MIDI In CHOP and then divides it by the framerate of the project, which will then tell you the duration of the MIDI clip in seconds! Easy! All we have to do now is hit the Play button on the Timer CHOP and we can watch the MIDI file get scrubbed through in our Lookup CHOP. In the gif example below I added a quick Trail CHOP after the Lookup CHOP so you can see the values moving more easily:
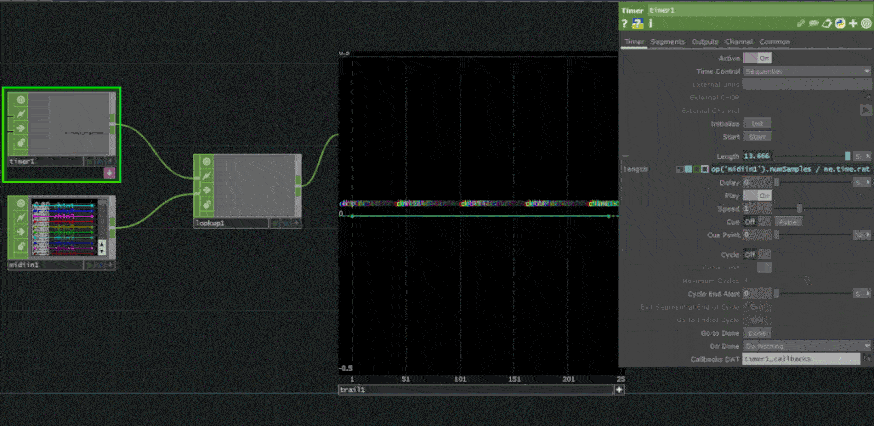
The trail here is showing us all the different note values firing off and both the pitch bend and mod wheel channels moving as well!
Wrap up: Load MIDI Files in TouchDesigner
While MIDI might be a part of the past for some folks, it’s still very much the present for a lot of developers and artists. Especially when it comes to doing things like recording music videos or collaborating with other artists, being able to read full MIDI files into TouchDesigner and playing them back for your control signals is extremely useful. Enjoy!