TouchDesigner is an incredibly versatile tool for real-time rendering, live performances, and virtual production. While TouchDesigner ships with the ability to manipulate audio, other software, like Max, is better suited to creative musical coding. With a bit of OSC interfacing and some elbow grease, TouchDesigner and Max/MSP can work together to create spectacular reactive audio/visual works in only a few minutes.
In this walkthrough, we’ll build a TouchDesigner and Max/MSP patch capable of using video to generate real-time audio. By the end of this post, you’ll have your own musical composition generator that works with any and all visuals!
With that said, let’s jump right in!
Your Best Crop TOP
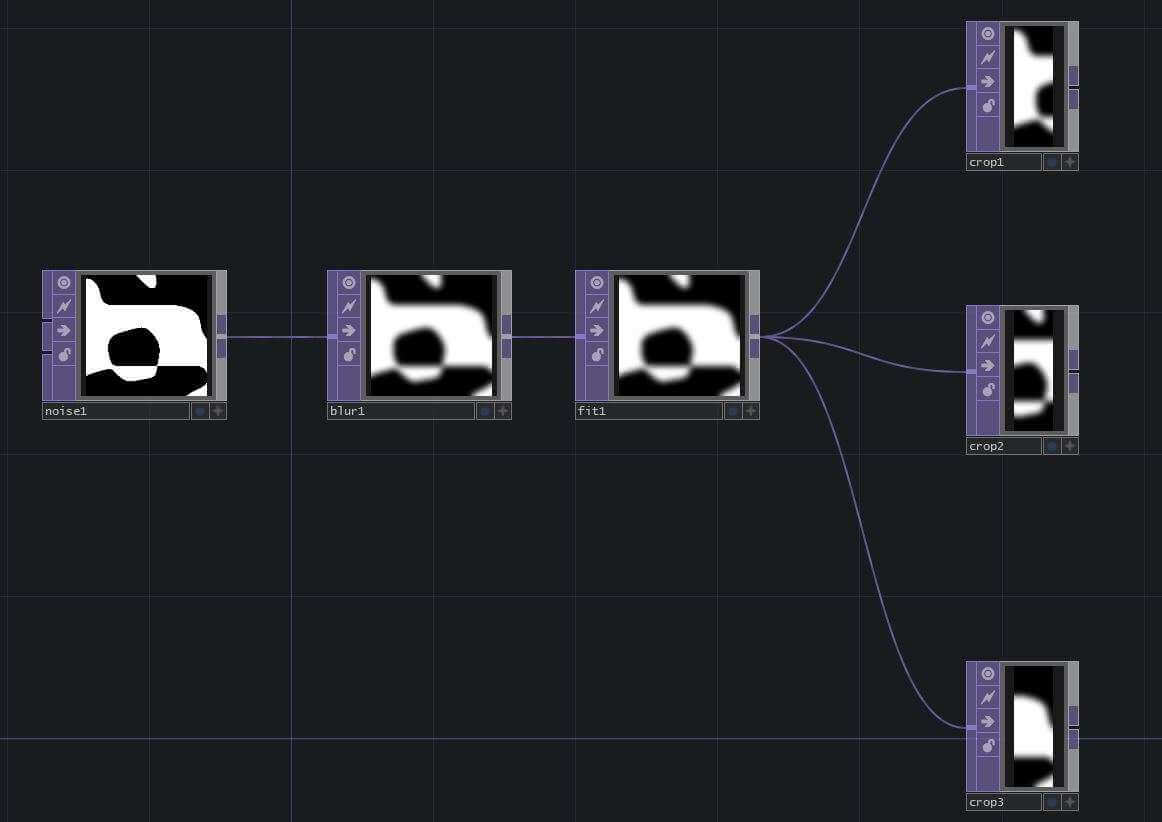
First, boot up a fresh TouchDesigner file and drop in whatever kind of video content you’d like – for this walkthrough, I’ll be using a Noise TOP with some motion in the X-axis (hint: to make the Noise TOP move automatically, use the built-in absTime.seconds function on any axis). Next, attach a Blur Top to your video source, then connect a Fit TOP to your new Blur and set “output resolution” to half or lower. This step ensures you’ll use processing power as efficiently as possible by downscaling the video input, saving valuable frames in the process.
Now, add three Crop TOPs to Fit TOP, leaving space around each as the branching networks will start to take up space. With these Crop TOPs, we’ll be dividing our video into three equal subdivisions that’ll make for some exciting audio possibilities in the upcoming Max/MSP patch. Since you’ll do this by dividing the video into thirds, you’ll set one Crop TOP’s “crop left” to 0 and “crop right” to 0.33, the next Crop’s “crop left” to 0.33 and “crop right” to 0.66, and the final Crop’s “crop left” to 0.66 and “crop right” to 0.99 (if you ever wondered how high school algebra was supposed to help you later in life, you found your answer!).
Your TouchDesigner patch should now have three distinct paths, each starting with a Crop TOP, that will eventually look exactly the same once the patch is completed. For the sake of simplicity, you can do the following steps on just one of your three branches then duplicate it for the other two respectively.
Shuffle the Deck
Add a Null TOP after your Crop TOP, then route your new Null TOP into a fresh TOP To CHOP – from here will be working with raw data, and the patch from this point onwards deals largely with number-crunching. Route your TOP To CHOP into a Shuffle CHOP, and set “Method” to “Sequence Channels by Name.” The Shuffle CHOP is an extraordinarily versatile tool we’re using to distill all of the video data in our branching paths into more easily usable and organized structure that’ll help with managing our massive array of numbers (for a more in-depth explanation of the Shuffle CHOP among other import TouchDesigner concepts, check out this article). For the sake of processing, you’ll want to turn the viewers for your TOP To and Shuffle CHOPs off – just seeing all of those channels can slow down your system significantly.

Next, connect three different Analyze CHOPs to the output of your Shuffle CHOP. Set the “Function” parameter in one Analyze CHOP to “Maximum,” another to “Average,” and the last to “Minimum.” Connect each Analyze CHOP to its own Null CHOP and, for all intents and purposes, you’ve got all the data you need to create your reactive musical composition in Max! For this walkthrough, we’ll be using the output of the Analyze CHOP set to “Average,” to which we’ll attach a Rename CHOP and, in the “To” field, change the channel names depending on which crop they contain info for and what color the data consists of (for example, the branching path for the leftmost crop of the video will end with a Rename CHOP that renames the channels to leftR, leftG, and leftB respectively). This is a lot of complicated information, so if you’re confused, you can use the following image for reference or check out how it looks in the sample files at the end of the post:

For the last two steps, you’ll connect all three of the Rename CHOPS to a single Merge CHOP, then route that into an OSC Out CHOP, setting the “Network Port” parameter to 5000. You’re all done with the TouchDesigner part, and now it’s on to Max!

Onto the Audio
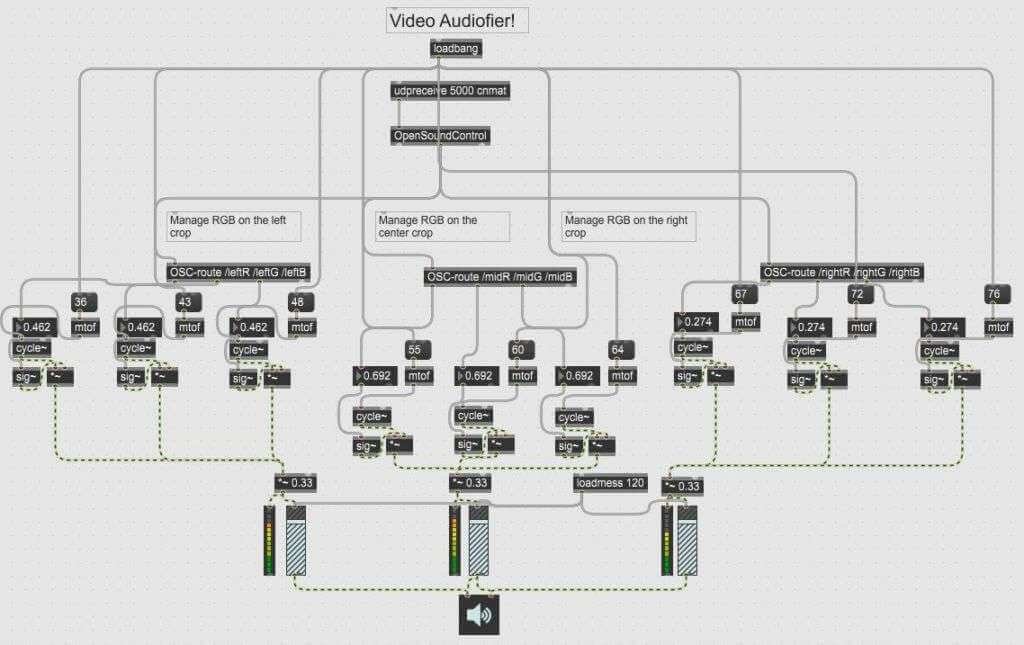
Create a new Max/MSP patch, drop in a udprecieve object, and connect that to an Open Sound Control object (if you can’t find these objects, my last post goes over how to install the necessary CNMAT library we’ll be using). Next, create three OSC-route objects, each one pertaining to the same branching paths in your TouchDesigner paths, with arguments to match. Each of the three OSC-route objects should have 3 arguments like “/leftR /leftG /leftB” that match the Rename CHOP’s channels.
You’ll be creating nine noisemakers here, each a simple sine wave generator, constructed as follows: connect the outlet of your OSC-routes to a float (shortcut: F key), then connect that float to a sig~ object; create an mtof object and connect it to a new cycle~ object. Route the output of both the cycle~ and the sig~ objects into a single ~* object, and you’ll have a volume controller for your sine waves! The mtof operator takes MIDI input and translates it into the frequency domain that cycle~ works with, responding best to message (shortcut: M key) inputs. In my patch, I used a C-major chord as the compositional baseline, with the result looking like this:

Get Our 7 Core TouchDesigner Templates, FREE
We’re making our 7 core project file templates available – for free.
These templates shed light into the most useful and sometimes obtuse features of TouchDesigner.
They’re designed to be immediately applicable for the complete TouchDesigner beginner, while also providing inspiration for the advanced user.
Down the Branching Paths
Each of your branches should consist of three individual cycle~ objects, which you’ll now connect to a *~ object with its only argument set to 0.33 (this is to limit volume so as to not immediately cause clipping upon playback). Attach a single gain~ object and a meter~ object to each of the three new *~ objects, allowing for volume control and a visual readout of how loud your signal is. Drop in an ezdac~ object (for further reference on how to set up your soundcard and audio output in Max, this article comes in handy) and connect your branches to it, with your leftmost branch connected only to the left input, your center branch connect to both inputs, and your right branch only connected to the right input. With this setup, you’ll be able to hear your image move across your screen with a dramatic panning effect!
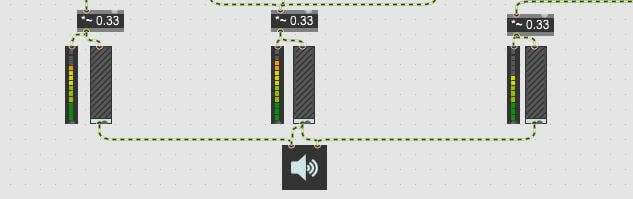
For the sake of ease, you can attach a single loadbang object to all of your MIDI messages, and attach a single loadmess object with the argument 120 to each of your gain~ objects. This ensures that every time the patch is opened, all you’ll have to do is click on the ezdac~ and you’ll have immediate playback at a reasonable volume.
Project file downloads
You can download the project files here for your own reference and usage:
TouchDesigner Reactive Audio: Your Own Little Noisemaker
And that’s it! Go ahead and play around with your input image to hear all sorts of interesting results, or even use the input data from TouchDesigner to control parameters in your favorite Max vst~ object. With your new setup, your options for sonifying visuals is as limitless as your imagination! Check out the fantastic Max/MSP forums for further inspiration on how to use your new patch to its potential, and stick around to read more about the power of TouchDesigner if you haven’t already!