Cameras and projectors share a lot of similarities. For audio folks, they have a similar relationship to microphones and speakers. If you’ve got any DJ friends, you’ve likely heard of a story where they plugged their headphones into the mic jack and started yelling! Cameras and projectors take their relationship even further because in softwares like TouchDesigner, we use cameras to simulate the point of view of a projector but we can also use them to emulate projecting images from a certain position. Here’s a quick way to get started with that!
Project setup
This question was asked inside of our HQ PRO group and I made a simple small example of how to set this up. Let’s dive right in. The first thing I’m going to do is split my pane in two so I can have the network editor open on the left and I’ll switch my pane type on the right to be a geometry viewer:

This will allow us to see our projector and the geometry getting projected on easily in an interactive viewer. The next thing I’ll need is the geometry to project on. I’ll start by making a Geometry COMP, going inside of it, deleting the default Torus SOP, adding a Grid SOP, and then enabling it’s render and display flags:

Once I have that, we’ll start seeing some action in our geometry viewer pane!

Texturing our Geometry
Next up, we’re going to texture our geometry with whatever texture we’d like to project. This is the real trick behind this whole setup. It’s not that our Camera COMP later will physical shoot photons out of it, but what we’ll be able to do is re-generate new UV co-ordinates on the geometry based on the camera’s perspective. It gives us the same visual end result as projecting directly from the camera. Don’t worry, we’ll see this in action shortly! But first, texturing our geometry. I’ll create a Phong MAT and assign that as the Geometry COMP’s Material parameter. Then I’ll create a Movie File In TOP, pick a nice image/video with it, and then assign that to the Phong MAT’s Color map parameter. It should look like this:

Setting up the camera/projector in TouchDesigner
Now the final step before we perform some magic, setting up our camera/projector. Let’s create a Camera COMP and I’m going to move it’s transforms to bring it closer to the grid and slight above the grid (looking down as if it was a projector). This will look like this:

One of the great things I love about the geometry viewer pane is that you can even see your cameras and lights in it, making it much easier to orient things quickly. Great so we’ve got our essential components ready now.
“Projecting”
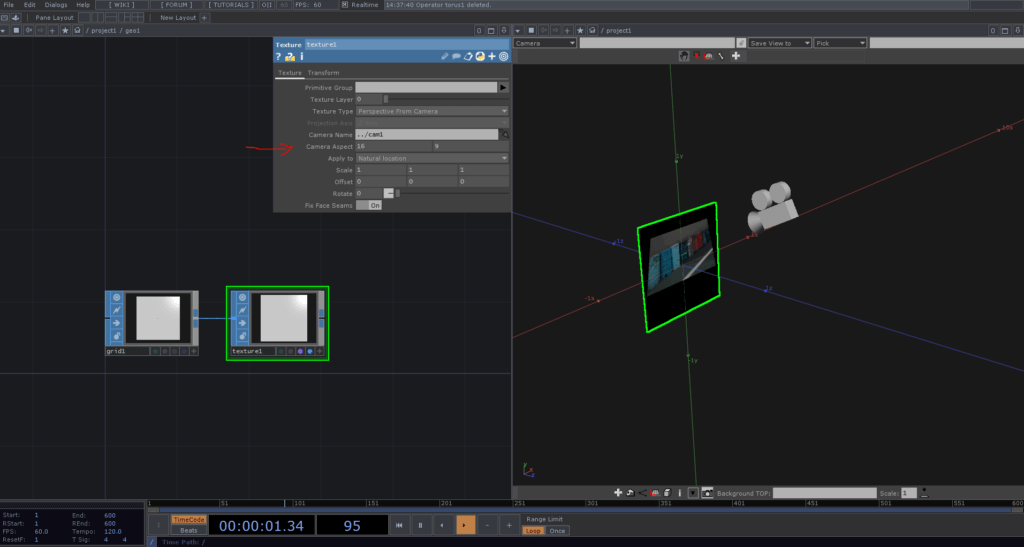
Here’s where our UV magic happens. As I mentioned earlier, we’re not technically projecting out of the camera. Instead what we’re doing is recalculating the UV map on the geometry based on the view of the camera. Sounds like something that would be hard, but all we need is one node! Let’s go into our Geometry COMP and add a Texture SOP after the Grid SOP. The Texture SOP is great for recalculating UV’s in a lot of situations and the texture type we’re going to set is Perspective from Camera. This allows us to reference a path to a camera just below it. Here we can type ../cam1 and then turn off the display and render flag on the grid and turn them on for the Texture SOP. It will look something like this:

One of the call things you’ll immediately see is that if we now move our camera around, the texture on the Grid SOP is going to react just like if the camera was physically projecting that texture onto it!

Get Our 7 Core TouchDesigner Templates, FREE
We’re making our 7 core project file templates available – for free.
These templates shed light into the most useful and sometimes obtuse features of TouchDesigner.
They’re designed to be immediately applicable for the complete TouchDesigner beginner, while also providing inspiration for the advanced user.
Final touches
So we’re almost there! The final two things we’ll want to do to make this just right. The first is that I recommend disabling the texture wrapping that happens by default on the material. To do this we can go to our Phong MAT, click the >> next to Color Map and then set Extend U and Extend V to Zero like this:

That way you’ll “project black” when your geometry is outside of the field of view of the camera. The second thing is the set the aspect ratio. You can do this manually by middle clicking on your Movie File In TOP, checking the aspect ratio next to the resolution (in this case it is 16:9), and then setting the Texture SOP’s Camera Aspect parameter to match that. Once you do that, you’ll notice your texture isn’t being stretched anymore on the geometry.

In the above picture you can see that it’s starting to feel like a real projector! And that’s all there is to setting this up! The nice thing about this is that it’ll work with just about any geometry. You could replace the Grid SOP with a Sphere SOP and it would look like this:

And you can see behind the scenes everything else automatically recalculates itself correctly.
Wrap up: Camera as Projector in TouchDesigner
Working with projections in TouchDesigner can feel tricky since there’s no out-of-the-box projector component. But using a Camera COMP and a few tricks like this can quickly bridge the gap for many use cases or previz setups with less than 5 nodes! If you want to take your learning to the next level using actual projectors, check out our projection mapping resources here. Enjoy!
