You’ve got a hold of the new 2020.20000 build of TouchDesigner and you’ve seen some amazing examples of all the new features to support point clouds in TouchDesigner… but how do you even get started? What’s a point cloud? What are these crazy file formats? How do I use this data in TouchDesigner? These are all fair questions and today’s post will dive in and leave you with an example project file you can use to start playing around with TouchDesigner point clouds!
What is a point cloud?
First up…what’s a point cloud? Keeping it really simple, a point cloud is a lot of data in space, represented as points. I know…you were probably expecting something more…but there’s not really much more. Lots of points, lots of data, usually representing something 3D. The basic information set you’ll almost receive are the XYZ positions of those points, but as point cloud workflows become more and more prevalent, a lot of other kinds of data are being passed along in the point clouds, such as RGB colour data. You’re probably used to see a point cloud as a lot of points, but it’s quite common to take an object, like a 3D box or sphere, and put one of those at every point. This is still a point cloud but you’re just seeing objects instanced at all the points. You can do fancy stuff like connect the dots in a plexus-like effect or any number of effects. At the end of the day, these are all point clouds.
Getting started with point clouds in TouchDesigner
Previously, working with point clouds was a bit of a slog, because you often had your data in a text-based file and you had to load it into TouchDesigner and process it a bunch before you could even use it. The new Point File In TOP makes this workflow much easier. To get started let’s download a point cloud file! There are many types that are supported inside of TouchDesigner and the best thing you can do is read the wiki to find out what those are. In this example you can download this point cloud I found online:
http://www.libe57.org/data.html
On that page there is a bunnyData.pts file you can download. This is one of many formats of point clouds that we can use, but all of them will follow the same process we’re about to go through. The first step is to load this up into a Point File In TOP and when you do so, you’ll see something like this:
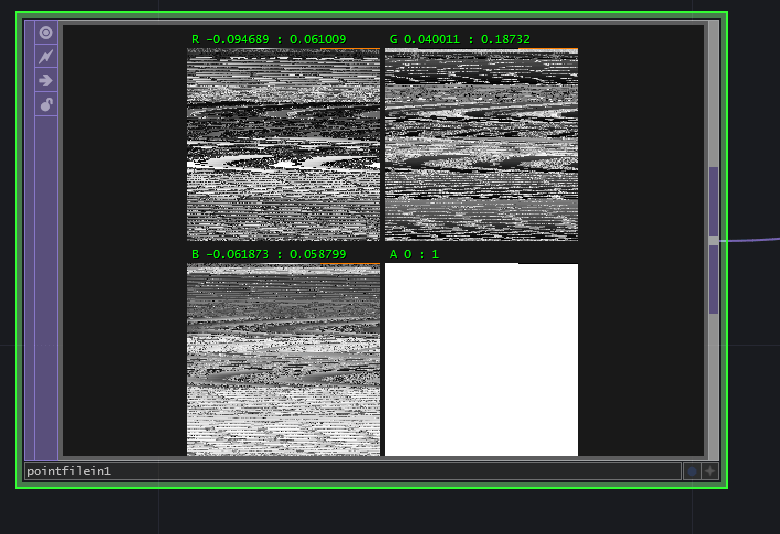
Hoooooooo boy that’s something interesting. You’re probably not used to seeing something like this if it’s your first time working with point clouds or general data inside of TOPs. On top of that, this is a new viewer format of TOPs that shows you a separate rendering of the RGB channels. TouchDesigner does a nice thing where it tries to automatically find the XYZ data in your point cloud and assigns those to your RGB channels. How can we tell this is working? Easy! Just activate the viewer, and right click on it, and select View as Points.

This awesome new feature auto-magically gives you a 3d view of the point cloud data. So we can immediately confirm the XYZ channels are mapped correctly. If you ever need to get out of this view, it’s as easy as right clicking and selecting View as Image:

Ok so now what??
Straight to the instancing!
The reason we’re so excited for Point File In TOP is that you can immediately use this data for instancing when combined with another new feature in TouchDesigner, which is to instance based on TOP data. I could make a quick Null TOP, connect that to a Geometry COMP’s instancing page, and then assign my RGB channels to XYZ and we’re almost there!

Now after you’ve done that, you might be thinking to yourself “Elburz! That looks all crazy and doesn’t look like anything!” You’re right! This a common instancing thing you should be careful of. Our default Box SOP size is 1,1,1 and in this case the data range is also quite small. So it’s working except all of the boxes are just on top of each other. Something you might have seen before is that people will make their Box SOPs really small. Something like 0.001, 0.001, 0.001. But now we have new tools that are better than doing that! We have a new Math TOP, which allows us to re-range the values in the point cloud without having to make crazy small boxes. We can add this before our Null TOP (see why nulls are so useful!) and use the Multiply value to increase the range of values by 1000.

Once you do that and home the viewer of the Geometry COMP you’ll be created by our point cloud bunny! It’s that simple! A few nodes and we’ve gone from point cloud file to fully instanced cubic point cloud in TouchDesigner.
Point Cloud Usage in TouchDesigner
So that’s cool and all, but you might be wondering where you can use this. There’s lots of places this comes in handy. As point clouds become more and more common, you’ll be able to harness them very quickly. One good example of point cloud usage is with laser scanning or LIDAR systems. The native output of most of these systems is a point cloud. When you combine that with new hardware used as the Ouster laser scanners you can essentially get a laser scan into TouchDesigner and visualized in less than a minute. Even better is that the Ouster (and many new LIDAR units) can run in real-time. TouchDesigner recently added support for the Ouster in the Ouster TOP. Coincidence??? I think not!
Get a little fancy
Before leaving you off with some new thoughts about how to use point cloud files and LIDAR in your projects, let’s talk about the real reason behind all of this. Why are we excited about Point File In TOP? What was wrong with the previous methods? The GPU. Plain and simple. Now we don’t have to go through the CPU to do a lot of the point cloud work, which was always very slow and taxing on the system. The GPU can handle this data with ease. I was doing all of that GIF recording above on my Lenovo X1 Carbon while syncing Dropbox, Google Drive and running tons of apps on my system, because GPUs are just that good with big sets of data. When you start to think about how you can start doing a lot of this work on the GPU in TOPs, you can do things like generate a lot of noise on the GPU and add it to the data with a Composite TOP:
Now that may not be the most creative thing ever, but it’s just an example and took me an extra two TOPs. And remember, that’s running on my ultrabook at around 60fps…so the sky is the limit with your creativity because of how efficient these GPU workflows are. That’s really one of the main reasons why you’ll see pros excited about this new set of operators and workflows.
File download
If you’d like a copy of my example, you can download the zip file below!
If you’re keen to practice more with 3D point clouds, check out this tutorial next:
Wrap up
So point clouds! You should know what they are now, how they work, how to quickly bring them into TouchDesigner and visualize them. From there, your creativity and exploration is the only limit of what’s possible. This is an important workflow to start investigating and learning because TOP-based data workflows are becoming the new norm for high performing TouchDesigner installations. The more of these new workflows and interactive technologies you understand and can harness, the better you’ll do on epic projects. Enjoy!