An often overlooked feature of TouchDesigner is that it can actually host a web server! This feature has flown under the radar for a lot of developers and artists but it gives you an easy way to receive messages from all kinds of other systems. In this post, we’ll show you how to send messages and data from an iOS device (or Android device) to your TouchDesigner project!
Setting up the Web Server on TouchDesigner
First thing we need to do is setup our web server in TouchDesigner. This is relatively easy in the newer versions of TouchDesigner because we can take advantage of the Web Server DAT. I’ll go ahead and make one and turn on the Active parameter:

That’s it! We now have a web server existing inside of TouchDesigner that we can send HTTP requests to just like any other web API that you might have worked with in the past.
As an example, I could even point my web browser to the address below:
http://127.0.0.1:9980
and I’d see a message from TouchDesigner returned in the browser:

In case you’re new to networking and IP addresses, the URL we entered into our browser can be broken down as follows:
- http:// – this tells the browser that we’re making an http request, as most browsers support multiple different protocols of communication
- 127.0.0.1 – this is shorthand for telling any app or request that you’re talking on your local system. 127.0.0.1 may also be represented as localhost and both just mean “I’m talking to another network application that exists on my machine
- :9980 – the colon and number represent that you’re targeting a specific port. Most default HTTP requests happen on other ports, but in this case we want to set up our TouchDesigner port on a specific port so that it’s easily targetable from any other application
The response we get in the browser is also being fed to it by the callbacks of the Web Server DAT. If we reveal the docked DAT and take a look we’ll see that on line 19 it sends a response back with some very simple HTML to type TouchDesigner: in bold and then the name of the Web Server DAT:

Communicating from iOS
I know I’m always going on and on about how important even a little bit of Python can be inside of TouchDesigner, but this goes even further when working on mobile devices. A lot of the time built in OS’s might not have a way for you to send HTTP requests. For example, if you were building a workflow on iOS to use Siri to trigger an action, the Shortcuts app doesn’t have HTTP requests natively built in. One great thing about mobile OS and almost any OS at this point is that they have some way of running a basic Python environment. On iOS, one app that does this really well is Pythonista which you can take a look at from the link below:
http://www.omz-software.com/pythonista/
There are plenty of others and I’m sure there are lots of options on Android as well. The key we’re going to use here is that from our iOS device’s Python environment we can create a small script that uses Requests Python library to send a POST request to our server and send some data over to it. First thing I have here is a blank environment in Pythonista:

One of the great things about a lot of these apps is that they include Requests by default in your installation, so you don’t even need to worry about installing it yourself. If you do need to install it, you would look in the documentation of your app and figure out how to install other libraries. Usually this will involve typing this somewhere into a command line:
pip install requests
So in Pythonista I can start by creating some variables I’ll fill in and start my import of requests:

We could do all of this on one line, but I prefer cleaner code that is easier to read. I’ll first need to define my URL. In this case, because my iPad is a different device than my computer, I can’t use 127.0.0.1. I need to find the IP address of my laptop. If you’ve never done this before, I recommend doing a quick web search for “how to check IP on Windows” or “how to check IP on macOS” as it’s different for both and there are a lot of ways you could get the same info. My machine has an IP of 192.168.0.148 on my local WiFi. So my URL is going to be that IP address and the port we saw earlier:

Now I need to define my data. For this simple example, and in most cases, I recommend using a dictionary because it feeds into Requests library very easily. So I can make a very simple dictionary with a key and a value like this:

Great so we’ve got our URL and data setup, the final step is to make our HTTP request!
Setting up the request
Now the last line of our code! What we’re going to do is make a new variable that will our request (just in case we need to use it again later in our script) and initiate a post request. As we’re doing this, we need to feed it two pieces of information. The first is our URL, then the second is to tell it that the data field it should send should feed from our data variable. This looks something like this:

This is why so many Python developers love requests. It makes it really easy to craft these complicated types of HTTP requests. So with that said, the basics of my communication pipeline are setup! We’ve got our IP address and port for our URL and we have a data dictionary that we’re feeding to the json argument of the post() command which will automatically json-ify our data for clean transmission. Now before I run this command, we should setup our receiving side of things in TouchDesigner.
Get Our 7 Core TouchDesigner Templates, FREE
We’re making our 7 core project file templates available – for free.
These templates shed light into the most useful and sometimes obtuse features of TouchDesigner.
They’re designed to be immediately applicable for the complete TouchDesigner beginner, while also providing inspiration for the advanced user.
Receiving the data in TouchDesigner
We already saw a quick look at the callbacks of the Web Server DAT and that’s where we’re going to look now. Without getting too long-winded about every step, essentially what we have to do is add our code to the onHTTPRequest() function because that will get triggered whenever we get an incoming request. It already has some code in there we saw that just responds back to the server telling it the connection was successful and sends the bold TouchDesigner text. You can leave this or delete it, but I prefer to leave it as it’s nice to send back a successful status to the client.
What we’re going to do is add our code right above those lines. The first thing is that we can see in the comments at the top of the script that we receive a dictionary called request with all the information inside of it, and it has a key called data:
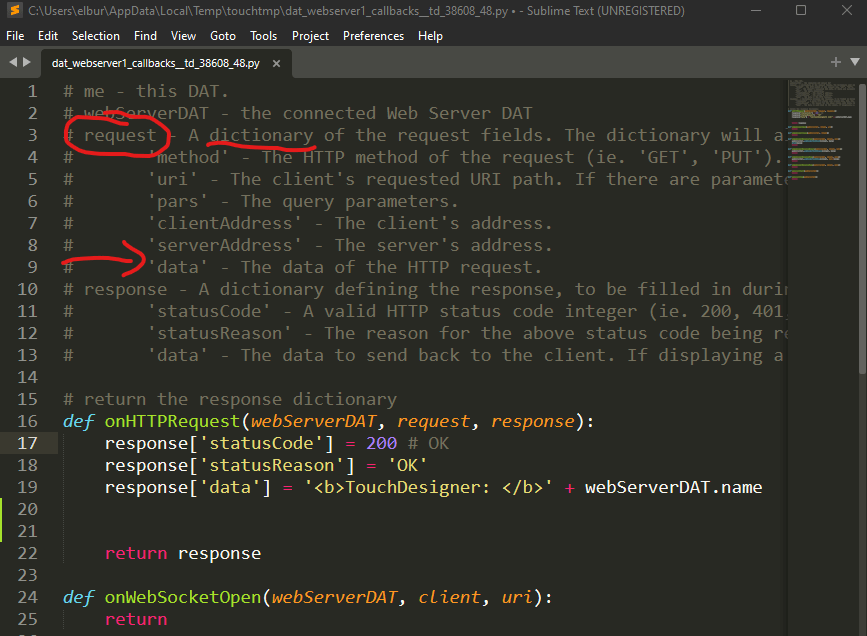
That’s critical information in telling us how to setup our code. So we know that we can go to request[‘data’] to get our data, let’s give it a try and print it out:

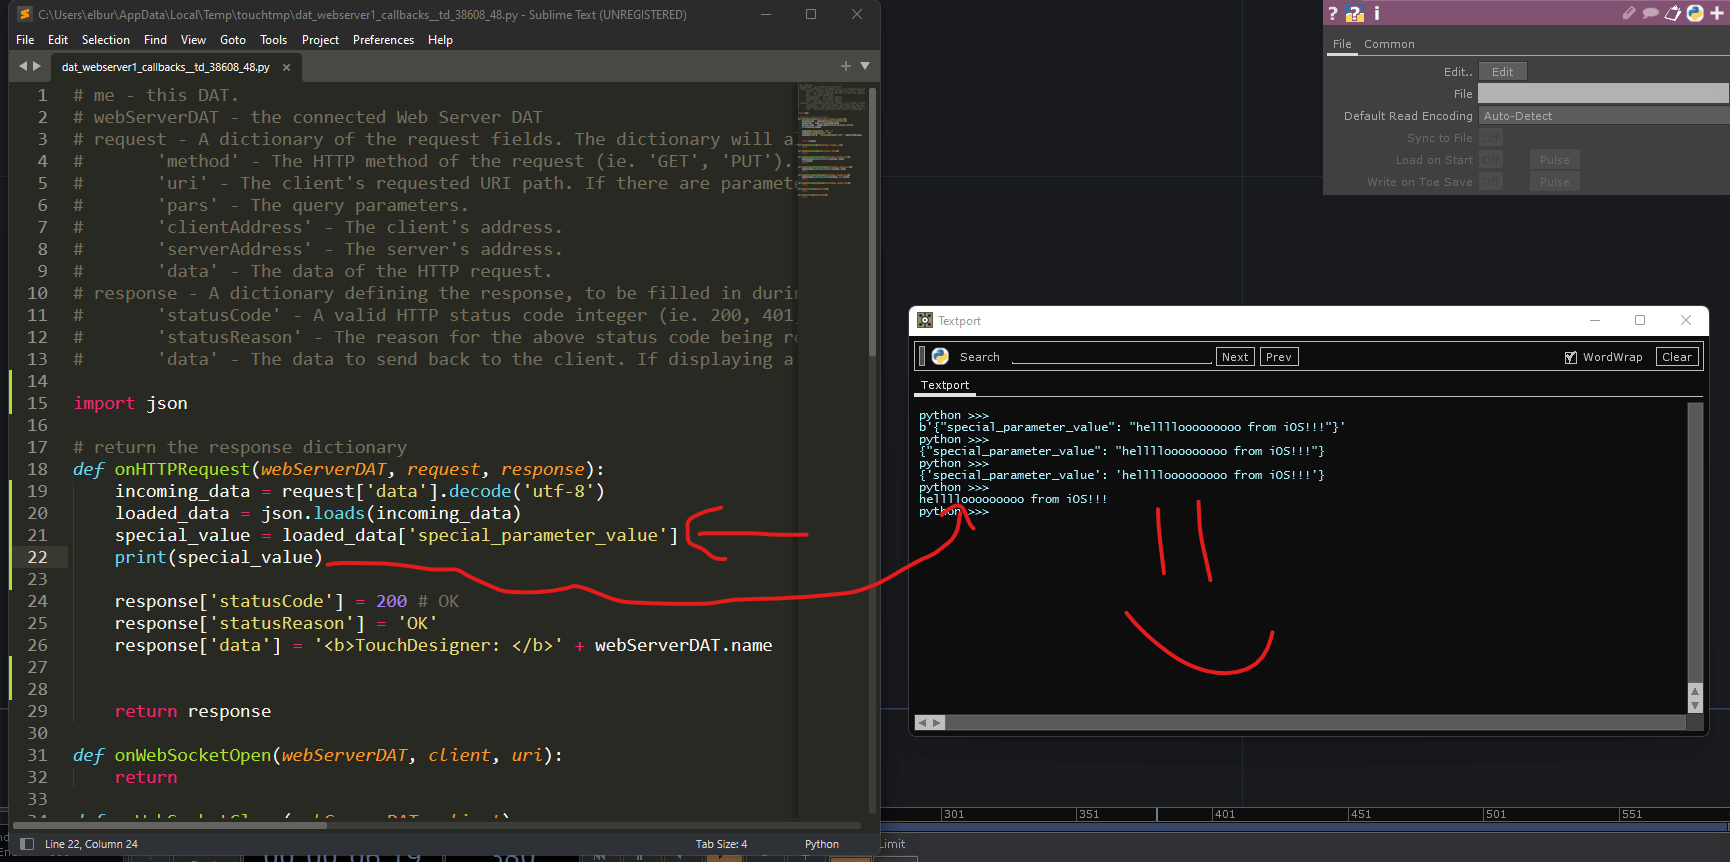
Success so far! We’ve received our message over the network. Now there’s some extra processing we have to do here. First is that you’ll notice a b at the beginning of the string. In Python this means it’s a bytestring. Without getting into the weeds, what we have to do is decode it for safety. We can do this by adding .decode(‘utf-8’) after getting the request data:

Now we have ourselves a normal run of the mill JSON object, so we can use the json library to turn it into a normal Python dictionary:

It might not look a lot different but that switch from double quotations to single quotations mean we can now move through this dictionary like any normal Python dictionary. So if I wanted to get my special_parameter_value I could use [‘special_parameter_value’] to get that specific data piece out:
If we had a more complex dictionary, we could pull out more of the keys using the same method. That’s all there is to it!
Further experiments: Web servers in TouchDesigner
Now we just setup the barebones connection between our iOS device and our TouchDesigner environment. But it doesn’t seem particularly useful yet. Well, in most cases, especially on mobile devices, these Python environments are built to be scripted within the environment. This means that when I install something like Pythonista on iOS, it automatically creates Shortcut actions that would allow me to run a script and feed information into it. So you could imagine that it’s only a few more steps to create a Shortcut (or other automation on Android) that takes an image automatically from the camera, encodes the data into base64, then sends it to Pythonista, which wraps it in the data dictionary we created, and sends it over to TouchDesigner. You could imagine any other scenario as well where you could call Siri or Google to run your automation via voice commands that can send preformatted data or presets to your TouchDesigner installation which could instantly add extremely high quality voice commands to your installation!
Wrap up
Whether you’re looking to simply send some commands from a mobile device to an installation or you’re building more rich media sending/voice command systems, being able to create a Python environment on your mobile device and have that communicate with TouchDesigner over HTTP requests is not only powerful but it’s pretty easy! The possibilities are really endless with what you can do with this! Enjoy!