This may not apply to you if you’re a TouchDesigner beginner, but if you’re a more advanced user, what do you do when you’ve deployed a project on-site and want to make sure it’s still running? Or perhaps check up on its performance, up time, or any other number of important components? Maybe you’re just looking to receive information from an internet-connected sensor for your project? Network-based messaging protocols are often a great option for these sorts of situations. MQTT is a commonly used messaging protocol for this purpose in the interactive and immersive field, and in this blog post we’re going to take a look at some of the MQTT basics, as well as setting up our own extremely simple MQTT server to receive messages from TouchDesigner.
What is MQTT?
MQTT (Message Queuing Telemetry Transport) is a lightweight, publish-subscribe, machine to machine messaging protocol which is commonly used on top of the TCP/IP protocol. It is commonly used with IoT devices due to the minimal resources it requires, reliability, and support for unreliable networks. MQTT can be found in the automotive, logistics, manufacturing, smart home, consumer products, and transportation industries.
If you’re not familiar with publish subscribe messaging protocols, let’s take a quick look at an example of how this might work in practice. There are two types of network entities in the MQTT protocol: the message broker and the client. As you can see from the image below, MQTT supports many clients.
The broker is the the main server that receives messages from all clients and routes them to their appropriate destinations. You can think of the broker like a post office, in that it receives and distributes information to the intended recipient.
The client is any device connected to the MQTT broker over a network (and running an MQTT library). Clients can publish or subscribe to messages, which are organized into a hierarchy of topics. When constructing a message to publish, at minimum you’ll define the topic as well as the message content, and if another client has subscribed to that particular topic, they will receive the message after it’s been published.
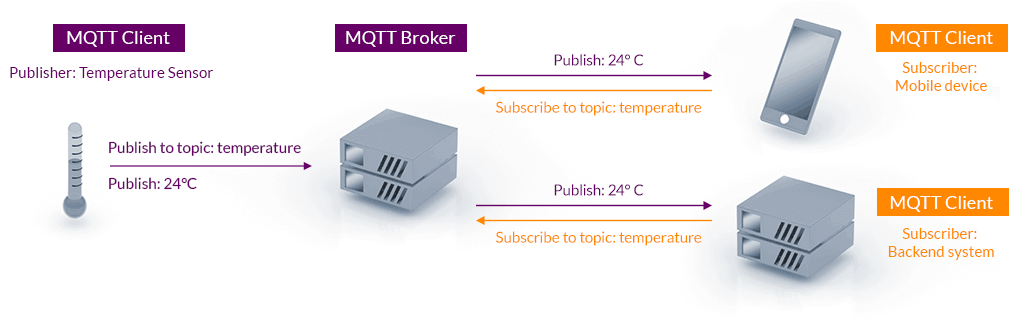
In the illustration below, we can see this in action: a temperature sensor is one of the MQTT Clients, and is publishing the current temperature to the topic “temperature”. The broker receives this message, and then routes the message to the two clients that have subscribed to this particular topic, which in this case are a mobile device and a backend system. Our example today will be a bit simpler than this, but it gives you an idea of how an MQTT system might look.
MQTT, as we briefly mentioned earlier, can be a great choice for immersive installation projects, especially when you need to keep track of aspects of the project remotely, whether that is something as simple as a confirmation that the project is still running, or reading the output of a sensor like in the example above.
Setting Up a MQTT Server for Immersive Systems with Mosquitto
Now that we have a basic understanding of what the protocol is, and why we might use it, let’s take a look at getting started with MQTT by setting up a basic server (or broker, to use MQTT terminologies) for our hypothetical immersive installation, with TouchDesigner as an MQTT client.
For this example, we’re going to use the free and open source Eclipse Mosquitto MQTT broker. Mosquitto allows for quick setup of simple MQTT brokers via the command line, with just a couple of simple commands.
You’ll need to download the corresponding version for your operating system at this page: https://mosquitto.org/download/. I’m working on Windows, so I downloaded the most recent 64 bit build installer and installed it.


If you’re on Mac, things are a little bit different, and require the use of the homebrew project via the Terminal. Check out the download page above for more info. If you don’t have homebrew already, you’ll need to install it first.
Got Mosquitto installed? Great! Let’s run a quick test to make sure it’s running/functioning correctly. On Windows machines, Mosquitto should automatically launch itself once the installer is complete and run in the background as a service.
Open up the command prompt or terminal and type in netstat -a. The netstat command is a utility that displays all kinds of information about current network connections. Here, we’re looking for a connection on port 1883 (which is the default port that Mosquitto uses). Your IP address may differ, but the main thing we’re looking for here is that the port is now in use.

If you don’t see that the port 1883 is in use after running the netstat command, mosquitto might not be running after all. Not to worry, though, as it’s easy to get the service up and running. As usual, this is done via the command line/terminal.
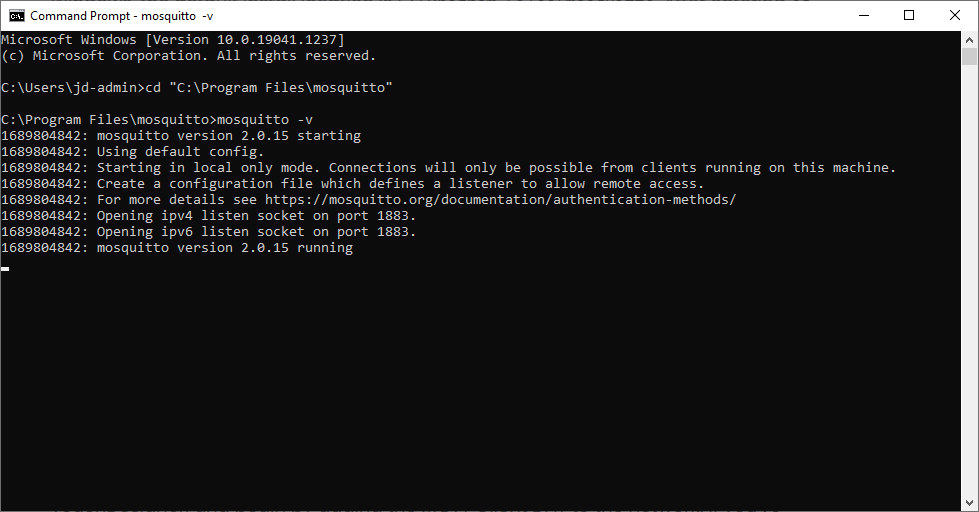
First, open up a new command line/terminal window, and then use the cd command to change your directory to the location where mosquitto has been installed. If you’re on Windows, the default install location is C:\Program Files\mosquitto. After entering cd "C:\Program Files\mosquitto“, you’ll now be able to run the mosquitto command directly to start the broker with the default settings. You can also use the mosquitto -v command to launch in verbose mode, which will give you realtime updates of the broker’s activity in the command prompt window.
Here’s what running mosquitto -v shows on my machine.
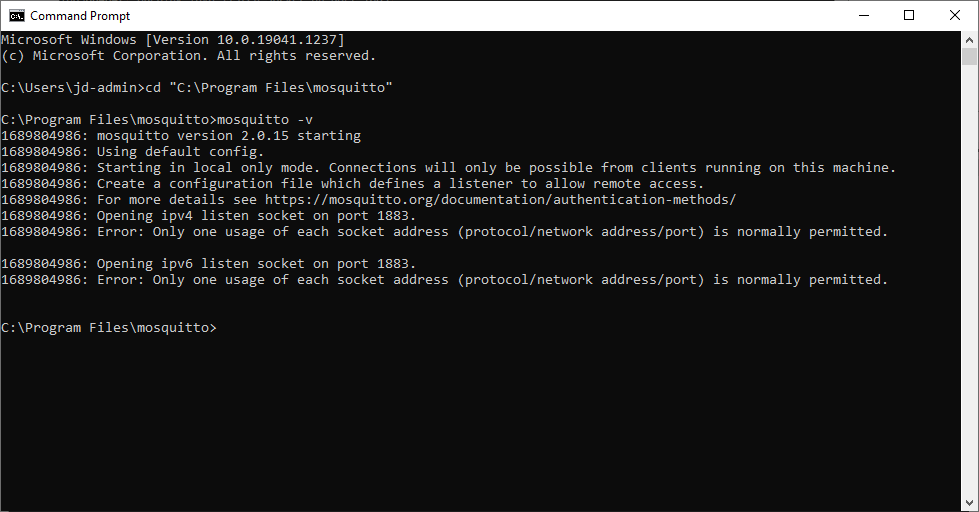
If mosquitto is already running, you might end up with an error like this:
Setting Up Our First Client: TouchDesigner
We’re going to use TouchDesigner as one of our clients for this example, and we’ll be setting it up to publish messages based on the output of a CHOP (just to give you an example of message content that changes over time). Start a new project in TouchDesigner, and begin by adding the MQTT Client DAT to the network.

If you’ve started Mosquitto in verbose mode and have the command prompt window open, you should see a couple of messages about a new connection on port 1883 and a new client. By default, the MQTT Client DAT‘s connection settings will match those of the default mosquitto configuration (which is being run on localhost, port 1883, with no username or password), and thus it should automatically connect.

Publishing Messages with the MQTT Client DAT in TouchDesigner
A core component of the MQTT connection protocol is of course the message! We’ll set up a simple CHOP network to generate some random data every so often and then publish that data to the MQTT broker. Although the data being sent to our MQTT server is arbitrary in this case, the point here is that we can source the data from something like a CHOP channel, which could be information coming from a sensor, joystick, or even stats about TouchDesigner itself.
First, add a Noise CHOP to the network. Change any of the settings you like on the Noise page – think about what kind of range of values you want, and how rapidly that data should change, and adjust the Period, Amplitude and Offset parameters accordingly. I’m going to turn on the Time Slice parameter on the Common page to show a time sliced version of the CHOP channel’s content.

We’ll use a Timer CHOP to output a pulse value on a regular interval, which will both sample the Noise data and publish the message to the MQTT broker. Add the Timer CHOP, then set the Length to 5 seconds, turn Cycle to on and Cycle Limit to off. On the Outputs page, turn the Cycle Pulse switch to on.

We want the cycles_pulse channel specifically to trigger the rest of the functionality, so add a Select CHOP and select the cycles_pulse channel in the Channel Names parameter.

To sample the Noise signal based on a trigger, let’s use the Hold CHOP. Add the Hold CHOP to the network, connect the noise1 CHOP to the first input and the select1 CHOP to the second input. We don’t need to modify any of the parameters in this case.

Finally, add a null CHOP to the end – and we’ve completed our CHOP network! We just have one more operator to add to our TouchDesigner network, which will be used to actually publish the message. This is the CHOP Execute DAT.
Add the CHOP Execute DAT to the network, and drag the null1 CHOP onto the CHOPs parameter. We only need the Value Change switch to be turned on for this functionality, so we can leave the remainder of the settings at their default and head into the code. With the chopexec1 CHOP selected in the network editor, hit Ctrl + E (Cmd + E on Mac) to open the code in an external code editor.
All of our code will be written in the onValueChange function. Add the following lines of code there, making each line is one tab stop from the left margin:val = str(val)
val = val.encode()
op('mqttclient1').publish('testData', val)
That’s it! Before we move on, make sure that you’ve hit the Start pulse button in the Timer CHOP and that it’s actually continuously cycling.
You might be wondering what’s going on with the val variable — the MQTT Client DAT’s publish function requires the message content to be encoded in byte format, and so we first convert the val (which is initially a float) to a string, and use the string’s .encode() method to end up with the information in bytes. The ‘testData’ port of the publish function is the topic of the message, which subscriber clients will use to receive the particular information that they require. Check out the mqttclientDAT page in the Derivative docs for more info about the available functions: https://docs.derivative.ca/MqttclientDAT_Class

Get Our 7 Core TouchDesigner Templates, FREE
We’re making our 7 core project file templates available – for free.
These templates shed light into the most useful and sometimes obtuse features of TouchDesigner.
They’re designed to be immediately applicable for the complete TouchDesigner beginner, while also providing inspiration for the advanced user.
Setting Up Our Second Client: Mosquitto Subscriber
You’ve made it this far, congrats! In our final section, we’re going to set up another client, which is going to subscribe to the particular topic of the messages that are being published by the TouchDesigner network. Don’t worry, this one is very quick, again thanks to Mosquitto’s straightforward implementation. Open up the command prompt again, enter cd "C:\Program Files\mosquitto“, and this time, enter mosquitto_sub -t testData. mosquitto_sub, as you might’ve guessed, sets up a client subscriber to the topic you specify via -t [topicNameHere]. As your immersive systems get more complex, you’ll likely have many different topics being published simultaneously, and at the same time might have multiple subscribers keeping track of different aspects of the project.
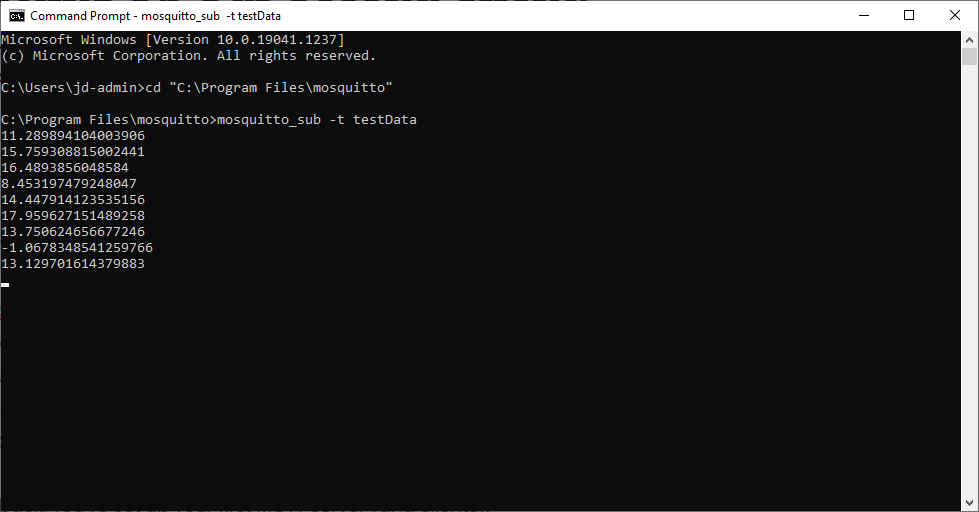
As soon as this process has been started, you should see numbers starting to appear in the window, every five seconds… look familiar? These are the messages from TouchDesigner! Since we’ve subscribed to the particular topic, we’re receiving the messages (and if we had other topics being published to, we wouldn’t be receiving the messages). Success! Give yourself a pat on the back, you’ve set up your first MQTT server (and clients).
Wrap Up
But wait, there’s more! As you can imagine, this is really only the beginning of what is possible with MQTT. When setting up an immersive system for deployment on-site, there are many additional considerations to make, whether that is related to security (MQTT ui can be configured to use TLS encryption with certificate, username and password protected connections), backup brokers in case of broker failure, or even the build-out of a robust series of topics for your client to publish to the broker. In addition, there are a host of cloud-based MQTT broker services available as well, along with more traditional commercial desktop-based tools. The official webpage for the project, https://mqtt.org, is a great resource for taking a deeper dive, and includes links to many other MQTT tutorials and related tools and resources. We hope that this post has given you a helpful first look at MQTT basics and how you can start navigating the process of deploying a server for immersive projects of your own!
Sources referenced for this article included mqtt.org, mosquitto.org, Steve’s Internet Guide, Derivative Docs and en.wikipedia.org/wiki/MQTT