We’ve been having a lot of fun with our new Twitch streams recently. We get to build interesting tools, learn new techniques, and work with the audience on their questions. One thing we thought could be interesting is building a native integration in TouchDesigner to stream in Twitch chat. Luckily, this isn’t hard to do and we’ll walk through everything you need in this post.
IRC and WebSockets
Twitch has a whole IRC infrastructure built into it for accessing the chat of a live stream. IRC is relatively simple and makes for a great protocol to receive messages on. Twitch then allows us to connect to the IRC chat channels using WebSockets, which is great for opening up persistent connections to web APIs. This persistent connection will mean that as events happen in the chat, we’ll instantly see them pop up in TouchDesigner. Here’s the reference page on Twitch’s website for what we’re doing today:
https://dev.twitch.tv/docs/irc/guide/
Authentication
The first think you need to do is get an OAuth token. The easiest way to do this is to click the link below while you’re logged into Twitch:
After you click Continue and then you accept allowing the token to be used on your account you’ll be given a string that looks like:
oauth:fsdgj4jg09nm203k4
This is your OAuth token. Keep this safe. Don’t send it to anyone and don’t reveal it accidentally while streaming because otherwise they can take over your account. Great so now we can start working in TouchDesigner.
Setting up WebSocket DAT
The first thing you need in TouchDesigner is a WebSocket DAT. We need a network address and port to connect to, which in the documentation are:
Network address: wss://irc-ws.chat.twitch.tv
Port: 443

Authenticating from TouchDesigner
Once we have the WebSocket DAT setup, we need to send some authentication credentials to the server. This consists of two things. The first is sending our OAuth token to the server as well as sending our nickname. The OAuth token we received a few steps ago must be sent completely, including the oauth: part. Let’s start by adding this to the onConnect() of the WebSocket DAT callback script:
oauth_token = 'oauth:s0sdgj93jg9s0dogm03m' #put your oauth token here
pass_message = 'PASS {}'.format(oauth_token)
Then we’ll create our nickname message. Our nickname is our account username all in lowercase letters. We also need to format these messages correctly for the server using IRC specifications.
nickname = 'yourusername' #put your username here
nick_message = 'NICK {}'.format(nickname)
Then we just have to send these 2 messages to the server:
dat.sendText(pass_message)
dat.sendText(nick_message)
This should look something like this:

Test the auth
Now you should be able to successfully connect to the IRC server. First, let’s print out any messages received from the server by adding this to the onReceiveText() callback:
print(message)This will look like:

Let’s go ahead and test our authentication. If you toggle the Active parameter of the WebSocket DAT, you should see the following messages printed to your textport:
:tmi.twitch.tv 001 <user> :Welcome, GLHF!
:tmi.twitch.tv 002 <user> :Your host is tmi.twitch.tv
:tmi.twitch.tv 003 <user> :This server is rather new
:tmi.twitch.tv 004 <user> :-
:tmi.twitch.tv 375 <user> :-
:tmi.twitch.tv 372 <user> :You are in a maze of twisty passages.
:tmi.twitch.tv 376 <user> :>
This means we’re successfully connected and our authentication has worked!
Join your chat
The final thing we need to do is connect to our Twitch stream’s chat channel. We need to create a JOIN message and send it after we connect to the server. We’ll add these after our initial connection lines:
channel_name = 'yourusername'
join_message = 'JOIN #{}'.format(channel_name)
dat.sendText(join_message)
In most cases, if you’re looking to get the chat from your own stream, then you channel name and nickname will end up being the same. These might differ if you’re using your OAuth token but then connecting to another users stream. These lines will look like this in our script:

Go ahead and turn on and off the Active parameter on the WebSocket DAT and you should see something like the following printed in your textport:
:tmi.twitch.tv 001 <user> :Welcome, GLHF!
:tmi.twitch.tv 002 <user> :Your host is tmi.twitch.tv
:tmi.twitch.tv 003 <user> :This server is rather new
:tmi.twitch.tv 004 <user> :-
:tmi.twitch.tv 375 <user> :-
:tmi.twitch.tv 372 <user> :You are in a maze of twisty passages.
:tmi.twitch.tv 376 <user> :>
:<yourusername>!<yourusername>@<yourusername>.tmi.twitch.tv JOIN #<channel>
It may or may not look exactly like that, but as long as you receive the first welcome message and then something that says JOIN at the end, then you should be up and running just fine.
What next?
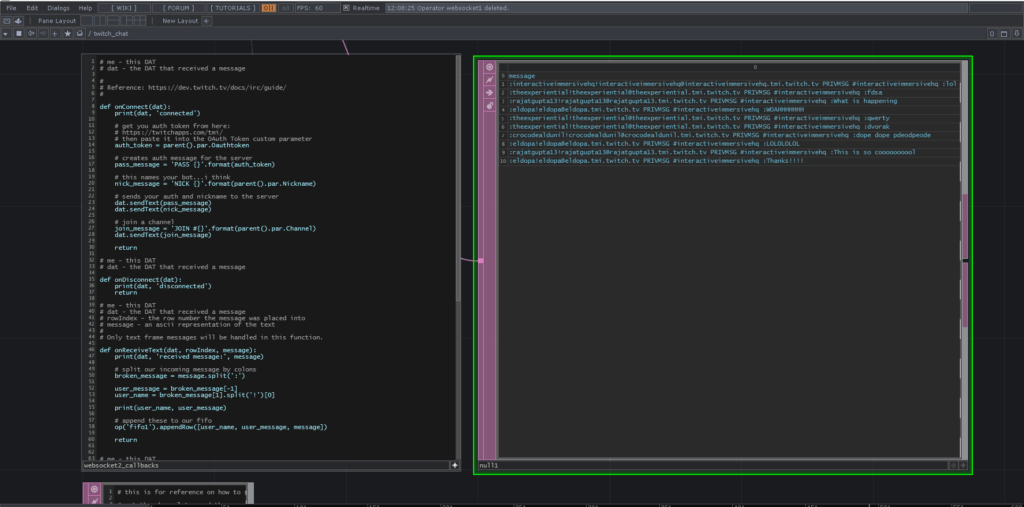
That’s all there is the connection! You’re now connected to your channel’s chat. As messages appear in the chat, they’ll appear in your WebSocket DAT like the following:

That’s really the hard part finished. From here you can decide how you want to parse the data. The IRC messages are a string message with all the different parts of it separated by colons (:). So you could easily parse this by doing something like the following in the onReceivedText() callback:
message_list = message.split(':')

user_message = message_list[-1]
user_name = message_list[1].split('!')[0]

print(user_name, user_message)
This will look something like this:

This will split the string at the colons, then pick out the main pieces from there. Most people will only need usernames and messages, and this setup will print all of those as they come in. You can then take those usernames and messages and append them to a FIFO DAT or a Table DAT or use them however you prefer in your project.
Get Our 7 Core TouchDesigner Templates, FREE
We’re making our 7 core project file templates available – for free.
These templates shed light into the most useful and sometimes obtuse features of TouchDesigner.
They’re designed to be immediately applicable for the complete TouchDesigner beginner, while also providing inspiration for the advanced user.
Reference script
For your reference, here is the complete WebSocket callback script:
# me - this DAT
# dat - the DAT that received a message

def onConnect(dat):
	oauth_token = 'oauth:sdgfhsg48h0hfg4gs'
	pass_message = 'PASS {}'.format(oauth_token)

	nickname = 'yourusername'
	nick_message = 'NICK {}'.format(nickname)

	dat.sendText(pass_message)
	dat.sendText(nick_message)

	channel_name = 'yourusername'
	join_message = 'JOIN #{}'.format(channel_name)
	dat.sendText(join_message)

	return

# me - this DAT
# dat - the DAT that received a message

def onDisconnect(dat):
	return

# me - this DAT
# dat - the DAT that received a message
# rowIndex - the row number the message was placed into
# message - an ascii representation of the text
#
# Only text frame messages will be handled in this function.

def onReceiveText(dat, rowIndex, message):
	print(message)
	message_list = message.split(':')

	user_message = message_list[-1]
	user_name = message_list[1].split('!')[0]

	print(user_name, user_message)
	return

# me - this DAT
# dat - the DAT that received a message
# contents - a byte array of the message contents
#
# Only binary frame messages will be handled in this function.

def onReceiveBinary(dat, contents):
	return

# me - this DAT
# dat - the DAT that received a message
# contents - a byte array of the message contents
#
# Only ping messages will be handled in this function.

def onReceivePing(dat, contents):
	dat.sendPong(contents) # send a reply with same message
	return

# me - this DAT
# dat - the DAT that received a message
# contents - a byte array of the message content
#
# Only pong messages will be handled in this function.

def onReceivePong(dat, contents):
	return


# me - this DAT
# dat - the DAT that received a message
# message - an ascii representation of the message
#
# Use this method to monitor the websocket status messages

def onMonitorMessage(dat, message):
	return
Wrap up
We’re really enjoying our time on Twitch. If you’ve been considering streaming or working with streamers, getting your Twitch chat live into TouchDesigner in real-time is a huge feature you can use to create interactive content. Everything from Twitch Plays to interactive controls for your installations can be easily achieved by using the above system. Enjoy!
