One the things I see often lacking in TouchDesigner work is natural camera movements. To be honest, I rarely see ANY camera movement! Lots of times this works, but many times, a ton of interest and depth can be added to a piece of work by adding camera motion. Developers and artists from all kinds of backgrounds converge on TouchDesigner as their tool of choice. Unless you’re coming from a VFX or similar industry which already works a ton with the camera, it may be something you’re not that comfortable with. Today I wanted to look at a really great set of tools that can give you a HUGE improvement in your camera work.
Update: Daryl, the creator of Cinetexture reached out and offered a generous 20% off coupon code for all of our readers. Use coupon code IIHQ at checkout to claim your 20% off!
What tools will we use for TouchDesigner camera motion?
The toolkit we’re going to use today is created by Daryl Atkins, who’s also known as State of Lux and recently started Cinetexture. Daryl is a fantastic London-based creative director who works across Unreal Engine, Houdini, TouchDesigner, and more. Cinetexture is a hub he’s created that combines tools and resources he’s built over the years that he’s now releasing. It’s a great site to check out and bookmark. He has a full Cinemotion Camera Motion Kit that I’d highly recommend grabbing. To start with, we’re going to use the free samples he provides when you sign up to his newsletter (at the bottom of the Cinetexture site!). After that we’ll dive into what the full pack looks like!
Free sample scene
Once you’ve filled out the form, you’ll get an email with a link where you can download the free samples. Go ahead and unzip them and you’ll see two folders. The one we’re interested in for this post is the CINEMOTION FREE CAMERAS. Then let’s navigate to the Idle folder. Inside we’re going to see lots of Alembic and FBX files. Let’s open up a new TouchDesigner project and drag and drop in one of the FBX files. We’re using the FBX files in this case because the Alembic’s don’t play as nicely with TouchDesigner. The full version of Cinemotion has even better ways to access the data (you’ll see at the end).

Upon dragging and dropping it in, you’ll already see it moving around and doing some work! The best part about these kits is that we don’t need to get complicated at all. Inside our FBX network we’ll see a Camera COMP:
We just need to use that camera for any rendered scene we want. In this example below, I made a quick scene with a box inside of a room, but you could make any scene you like. I’m rendering it with a default Camera COMP just so we can see what it looks like before hooking up our new Cinemotion camera:

Nothing fancy here, but enough stuff in the scene to see what the Cinemotion camera can do. So the final thing we need to do is have our Render TOP point at the Camera COMP inside of the FBX network. The value of that Camera parameter should then be set to:
RoamingA_Smooth0/Cinemotion_Cam_convertedtoTD
Once you do that, you’ll see you’ll be tapped right into the animation playing back in real-time!

Transform offset
One thing you’ll need to keep in mind when using these Cinemotion cameras is that they are all by default going to stationed at, or moving around, the origin point 0, 0, 0. This is something to note because by default, TouchDesigner cameras start at 0,0,5. So if you’ve already made a scene that worked with the normal camera and you’re trying to implement a Cinemotion camera, then you should either move the things in your scene by 5 units on the Z access, or better would be to move the camera rig to 0,0,5. While this sounds easy, doing this the right way might not be your first guess. The problem is that if you just went to the Camera COMP right now and set the Z to be 5, it would be in the wrong position because of the transformation hierarchy at play. Transformation hierarchies are a topic for another day, but at a high level, transforms are passed from parent COMP to child COMP and they compound. So it’s best to think about “moving the whole rig” instead of just moving the “camera” 5 units.
Inside of our FBX network, we can make a Null COMP and make it the parent of the Null COMP named Cinemotion_Cam by connecting the top connector of Cinemotion_Cam to the bottom connector of our new Null COMP.

Once we do that, we can use the new Null COMP to set our Z position to 5, and then that transformation gets passed down through all the children without messing up the way their own transformations are being applied.

This then moves our whole camera rig on the Z axis correctly, which will then line up better with the default camera position in TouchDesigner.
Get Our 7 Core TouchDesigner Templates, FREE
We’re making our 7 core project file templates available – for free.
These templates shed light into the most useful and sometimes obtuse features of TouchDesigner.
They’re designed to be immediately applicable for the complete TouchDesigner beginner, while also providing inspiration for the advanced user.
TouchDesigner Camera Motion: One Step Further
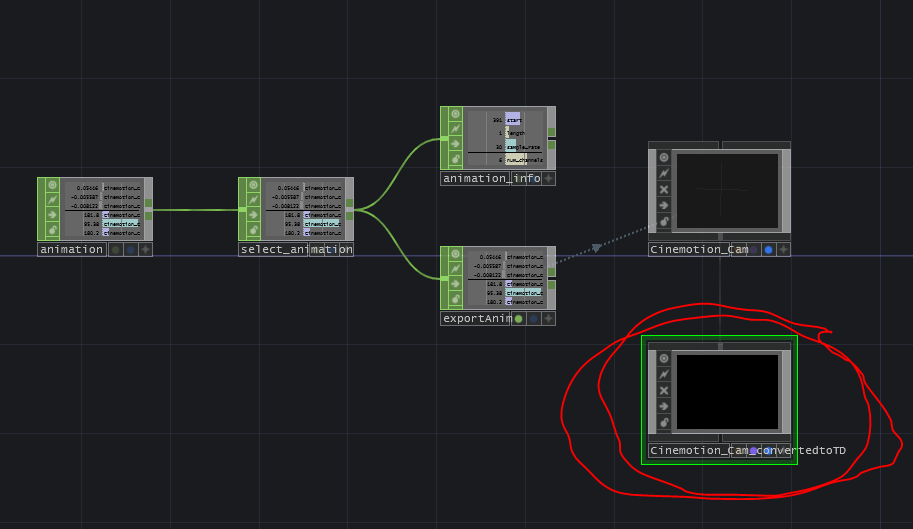
Already we’ve got something pretty great setup, and the free samples pack comes with a handful of other options but the full Cinemotion kit is worth picking up as well. Not only does it have a ton more camera animations, it also comes with all the animations are .clip files. This file type is inherited from Houdini which used it to save CHOP data in. Well…wouldn’t you have guessed, they are natively supported inside of TouchDesigner too! What that means is that instead of having to deal with the whole FBX import process, we can directly get access to the CHOP channels in their raw format. The best part? It’s as easy as a drag and drop:

This is amazing! If you’ve seen any of our posts about using Lookup CHOP combined with Timer CHOP, you’ll know how easy it is to take this type of data and really control it to your heart’s content. Then from there you can just map the values of each transformation channel onto a Camera COMP of your own and you’re off to the races.
Coupon code!
Quick update for all readers: Daryl, the creator of Cinetexture reached out and offered a generous 20% off coupon code for all of our readers. Use coupon code IIHQ at checkout to claim your 20% off!
Wrap up
We can’t thank Daryl enough for creating these assets. I think they’ll add a lot of value to the work of many artists and they’re very reasonable to get the full set of Cinemotion camera animations. I’d highly recommend checking them out as well as watching the full explainer video Daryl has created around the Cinemotion kit. I’m sure you’ll find them easy to work with and pretty fun to use! Enjoy!