
SPOILERS; .sbsar files, SubstanceTOP, Substance Select, Geo COMP, PBR Mat
[Editor’s note: Hi all! Elburz here! We’ve got the multi-talented Tavia Morra writing a great two part series on working with TouchDesigner and Substance Designer. Tavia is an illustrator and animator turned interactive developer and XR specialist. She’s had the great fortune to create solutions for Marvel, Toyota, Karen O, Dangermouse, Madison Square Garden, DJ Shadow, and more. Thanks again to Tavia for putting this great intro to working with Substance Designer and TouchDesigner together and for making the template downloads available for everyone!]
“Materials are like clothes and UVs are like patterns for clothes” -Tavia Morra
Part 1: Substance Designer
What is Substance Designer?
Substance Designer is a material creation program that doesn’t require knowledge of GLSL. There are loads of free resources for artists and designers which include PBR materials. If it makes sense in your pipeline to use them then have at it (after reviewing the terms of each resource).
But perhaps you’d like to make your own PBR material. Or maybe you’re looking to understand what each of the maps do in the PBR MAT in TouchDesigner. Either way, becoming familiar with the workflows of many tools and the entire process leads to a deeper understanding of the fundamentals of rendering and it might just bring an appreciation to the possibilities that TouchDesigner provides.
How Do I Get Substance Designer?
Substance Designer is available through a subscription via Adobe’s website, similarly to how one gets a Creative Cloud license. As of the time of this blog post creation, a subscription offering access to a suite of softwares including Substance Designer, Substance Painter, Substance Alchemist, and Substance Source.
| Name | What it does |
| Substance Designer | Material Authoring from scratch |
| Substance Painter | Applying Materials to Meshes. You can paint it on and it kinda feels like a fun airbrush. |
| Substance Alchemist | Material authoring but from other sources like photos or reference images. It’s got some AI driven tools to remove shadows and stuff like that. |
| Substance Source | Adobe’s material library. Also a great learning source if you want to see how other folks approach material creation |
Indie License (Revenue under $100K) is 19.90/month or $219/year, Pro License (Revenue from $100K to $100M) is $99.90/month or $990/year, and quoting for enterprise level requires contacting Adobe. Students and Teachers are entitled to a free personal license with account creation. Universities and Schools get a special academic pricing that requires contacting Adobe. And of course there is a 30 days free trial available if you wanna try it out. For students and teachers there are free license options that last for a year with the option to renew.
There are also community oriented spaces and services that users of the Substance Suite can go to. Adobe Substance classes at the Substance Academy offers tutorials, documentation, live streams, and more for folks looking to get their Substance skills off the ground. Substance Share is where creators go to share their creations, that is, their materials, filters, brushes, etc with the community at large.
But TouchDesigner Can Do That

Project file samples for download: https://github.com/ibeefalone/SD-TD
The title of this blog section brings me pause. For it dips its toe into the murky waters of answering the eternal question: “Just because I could do it…should I do it?”
We have a saying where I’m from “I’ll try anything 5 times”. I mean it’s worth at least trying once right? It’s good to have the ability to whip out a PBR Material in your back pocket because you never know when you might need it. I quite enjoy playing with multiple programs to see what benefits it may have when helping to define a media pipeline for a project. Perhaps you’ve got collaborators that slap in Substance Designer but don’t know TouchDesigner. Questions like the below are good to ask yourself:
- What is your project scope?
- What limitations of the scope would necessitate the use of Substance Designer over TouchDesigner and vice versa?
- Are there any interactive elements?
- Can you “afford” to create materials within your TouchDesigner network? Can you “afford” the time it takes to make it in one program vs the other?
- Are you working with other artists? If so, what tools are they most comfortable with?
Substance Designer can output a .sbsar file as well as bitmap files per each map. With a .sbsar file the Substance Designer user can expose parameters for use in other programs. While we’re focused here on TouchDesigner and Substance Designer, .sbsar files also work in Unreal Engine, Unity, Lumberyard, Cryengine, Maya, 3DS Max, Modo, Houdini, Cinema4D, Catia, Rhinoceros, iClone 7, Browzwear, Clo, Vue, Marvelous Designer, and Plantfactory…. The list goes ON and you can check out all integrations here.
If you’ve worked with Notch and TouchDesigner you may notice a pattern emerging with these real time technologies. Packaged and sealed off box except for the exposed parameters.
How do I use it?
This blog post won’t cover how to use Substance Designer beyond the very basics of getting your material out and into Touch, but there are some excellent tutorial series to get you up and running. If you’ve attempted to make materials or blended noises together in Touch before you’ll be right at home in Substance Designer. There were many times I found myself giggling because of the similarly functioning nodes/operators but with slightly different names. Additionally if you’ve used any of Adobe’s products you’ll find the ecosystem of Substance to be welcoming.
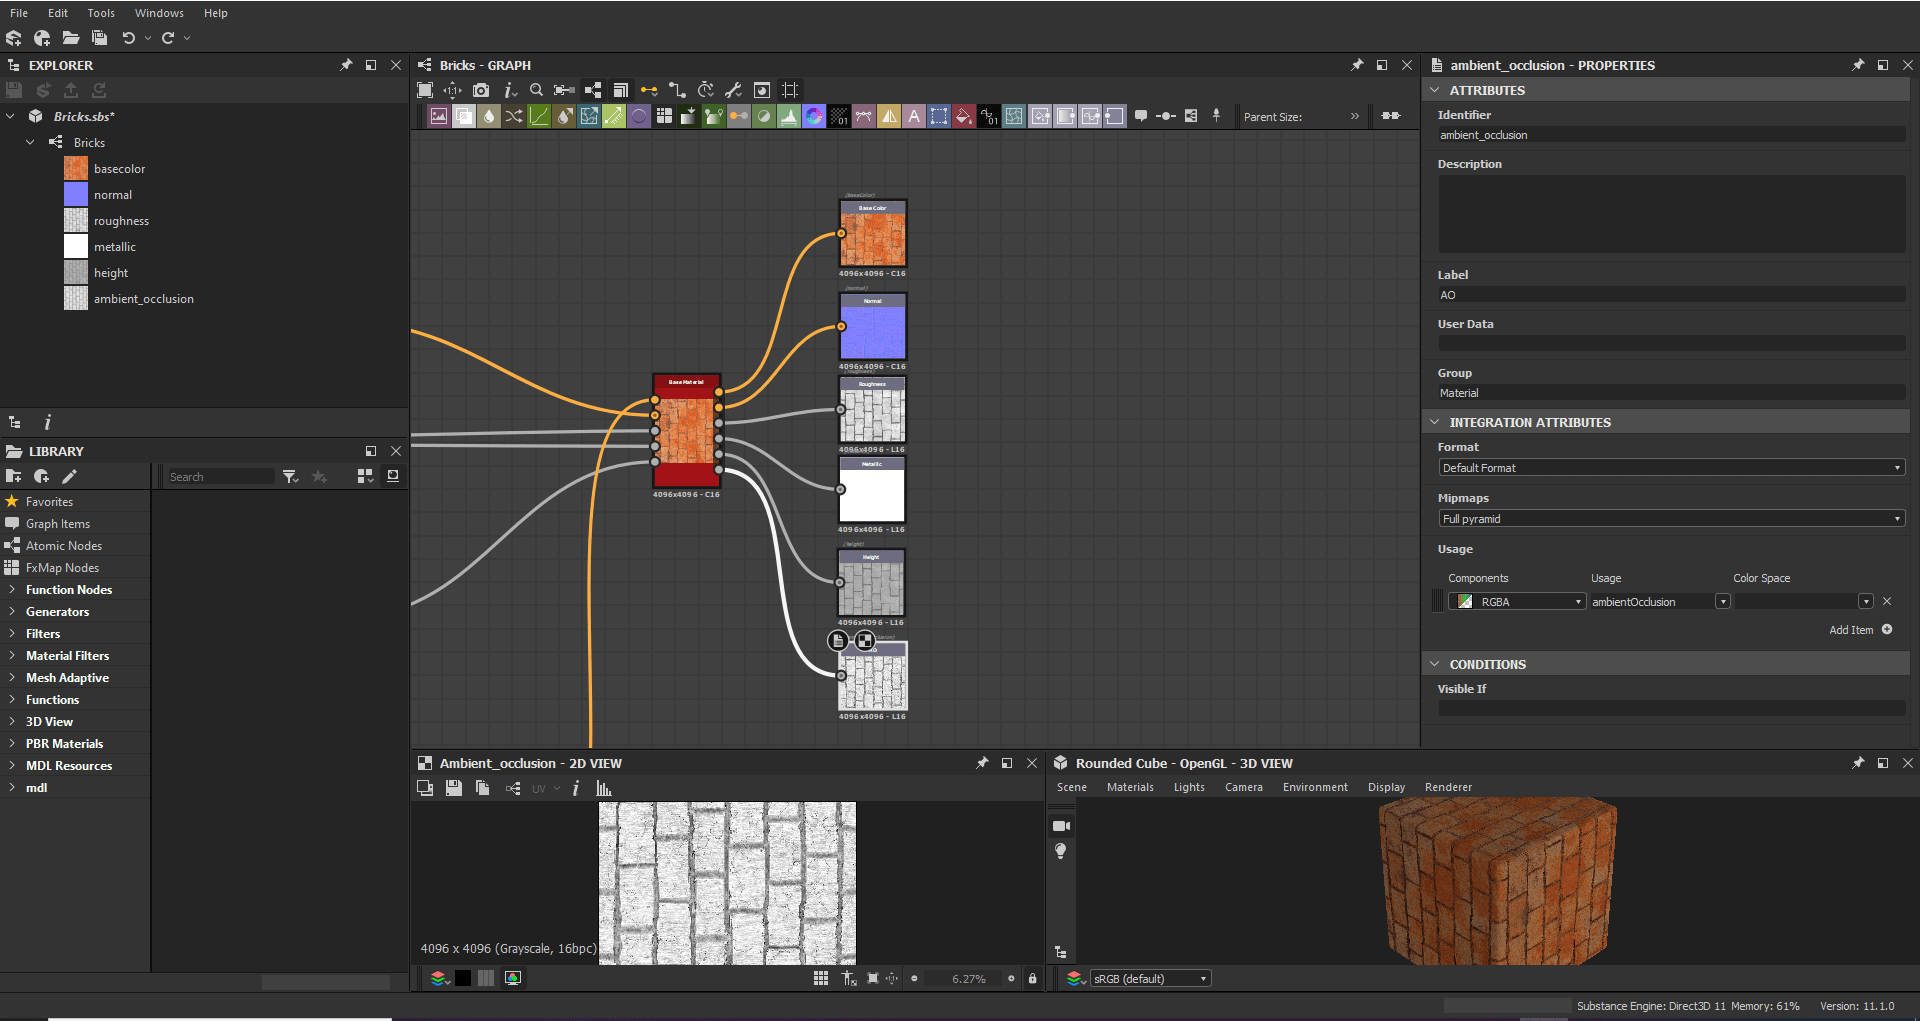
.sbs anatomy

Here we have an open .sbs which is Substance’s working file. In the center is our Graph view, where we string together Atomic Nodes, Noises, Generators, etc from left to right to build up our material.
On the top left is the Explorer which houses the graphs we make. We’ll use this area when we are ready to export either bitmap images of our maps or when we’re ready to export a .sbsar file to use in TouchDesigner. When working in Substance Designer this area also acts as a bin of sorts, holding within it not only the graph you’re working on but possibly a number of other graphs or substance files. Since it can hold multiple substance projects you can double click on any Graph within the Explorer window to explore the contents within. When you’re ready to return to your other Graph file, navigate to it in the Explorer window and double click it to return to your working Graph.
Below the Explorer is the Library. It’s got extensive noises to select from, blending nodes, generators, and other various goodies to use as building blocks for authoring your material. Another place you can find nodes to use is in the toolbar above the center Graph network area. Many, but not all, nodes are available there. Yet another place to access nodes would be to right click while your cursor is hovered in the Graph network area. If you choose to add a node with this method or via the Library you’ve got handy search bars to type the name of your desired node into. The toolbar, the Library, or the right click menu in Substance Designer are not unlike the operator family menu within TouchDesigner, in function.
At the bottom of the window is the 2D and 3D view. The 2D view is context sensitive to what the currently double click selected node is in the Graph. The 3D view allows us to see our material applied to a 3D form as we make it. Substance ships with a few platonic solids one would expect with a 3D program, like a box, sphere, cylinder, plane. It also allows you to import whatever 3D model you want in.
On the right is our Instance Parameters, which is not unlike the Parameter menu that TouchDesigner presents when you select an operator. It’s here the user can adjust parameters to their liking, export parameters to the top of the graph for import into another engine, set labels, etc. It is context sensitive to whatever Node is currently selected in the Graph. It is in this window that we can take a peek into exposing parameters for use in TouchDesigner.
Getting stuff out of Substance Designer
In an earlier section of this blog post “But TouchDesigner Can Do That” I linked to two files: one TouchDesigner file and one Substance Designer file. Feel free to download those for your perusal and to follow along (though you won’t necessarily require it to enjoy the post).
So you’ve made your beautiful texture and you’re ready to export the pure raw glory of your imagination into TouchDesigner. Well, you’ve luckily got a number of routes to go: exposing maps for use in the Substance TOP, exposing parameters for general use within TouchDesigner, and exporting bitmap images to apply to a PBR Mat. BUT FIRST a very important message:
Label everything!
Throughout this blog I’ll prompt you to label different areas of your Substance Designer project. It’s especially important to label your work otherwise your gorgeous Substance material won’t be read by TouchDesigner and/or your output images may be hard to differentiate from one another.
Setting up Outputs for Publishing Maps and Exporting Bitmaps
Publishing Maps and Exporting Bitmaps use a similar approach within Substance Designer which is why they’re kinda mooshed into the same section here. With this method of exporting we’re looking to get the image information out in some visible capacity. Whether to use Publishing Maps or Exporting Bitmaps also depends on what you’d like to do inside of TouchDesigner later. More on that later.
In order for us to do either one of these approaches we’ll first need to lay down Output nodes within Substance Designer via the node access menus. In this case I right clicked on the Graph network area and typed in “Output” into the available search bar.

Since my Base Material node has 6 output pins I append an Output node to every one of those pins. As I lay down each Output node I’ll notice the context sensitive parameter window on the right changes. It’s here I’ll take the extra couple of seconds to label what each Output node’s map is. As you add Output nodes you’ll notice them start to populate within the Explorer window in Substance Designer.
To output bitmap images navigate to the Explorer window and then to your Graph. Right click on the Graph name (not the .sbs name) and then select “Export outputs as bitmaps” from the available menu. These will spit out a bitmap for every output you specified in the Graph network area. They should appear in the same folder as your saved .sbs file on disk. Boom!


Next let’s take a look at Publishing maps. Luckily, we’ve already got a leg up on this step because we already laid down an Output node for each output pin on our Base Material node. So let’s take a look at these Output nodes again. Click on one and allow your gaze to fall on the context sensitive parameter window on the right. The identifier should be labelled with the correct map name, for example “Color” or “Albedo”. Below where it says Usage I’ll mouse over where it says Add Item and click the + symbol.

It’s here you’ll be met with three fields some of which will autofill: Components, Usage, and Color Space. In order for your maps to be published to the .sbsar file and then read by the Substance TOP you’ll need to fill in the Usage field via selecting an item from the available drop down menu.

It’s crucial you know which of the many options available is the correct one to assign to your output. Different shaders have slightly different naming schema for their particular maps so this area can be tricky. If you’re not sure what to select from the drop down menu, navigate back to your Base Material node in your Graph network area and hover your cursor over the output pins. Whatever name pops up there you should select here in the Usage dropdown. If done correctly your outputs should look something like this:


Once you’ve successfully added a Usage label to each one of your outputs then you’re just one step away from publishing your file! When you’re ready navigate to the Explorer window and right click on your .sbs filename. You’ll see in the right click menu an option to “Publish .sbsar file…”. Give that a little clickaroony.

If you check the folder containing your project file you should now see a .sbsar file! Woooo!

Exposing Parameters
So getting the image representation of the maps you’ve labored over is dope, but what if you want to import your .sbsar file into TouchDesigner via the Substance TOP and then want to change parameters of your material after the fact? This requires some pondering over what kind of thing you’d want to change in TouchDesigner later. Since I made a brick texture, I could think of a world in which I’d want to change the tiling of the bricks. Maybe I’d want more in the X or Y direction. Let’s see what that would take to do.
Within the provided file earlier in the blog navigate to the Tile Generator in the Graph network area and then select it, changing the context sensitive parameter window on the right. I want to be able to later dynamically change the X Amount and Y Amount of tiles in TouchDesigner, so I’ll expose these parameters. Click the small box on the right side of the window across from the parameter name and look for a “Expose as new graph input” option. If you’ve successfully exposed the parameter the Parameter name should turn a friendly blue color.

Next, navigate to the Explorer window and after clicking your .sbs file name you should see the context sensitive properties menu change on the right. Let’s look at the Input Parameters section. It’s here you should see the parameters we exposed, X Tiles and Y Tiles.

If we press the arrow to the left of these exposed parameters we’ll learn more about each parameters export settings. Let’s take a look at x_tiles. In it’s export settings we see the option to set it’s default value, a minimum value, a maximum value and more.

Once you’ve filled out all your pertinent additional information you should be ready to export your project to a .sbsar file just like we did earlier in the block. Right click on your project .sbs name in the Explorer window and select “Publish .sbsar file…”
Woo! Give yourself a big ol’ pat on the back. You gosh darn did it!
Wrap Up
Substance Designer is a material authoring tool that has two methods to export material maps including it’s .sbsar file and bitmap images. The exports of Substance Designer have many different integrations including TouchDesigner. Settings are important to get right within Substance Designer in order for it to be viewable and usable within TouchDesigner. If you’re a Substance Designer beginner, know that it is a great tool for allowing you to make high-quality materials and it’s worth checking out. Stay tuned for next week’s post where we dive into importing the materials into TouchDesigner!
