Do you want to do area tracking without paying top dollars for a Kinect sensor? This little hack uses a USB IR Camera to do the trick. They are commonly used as surveillance cameras and you can purchase one for about $32 USD on Amazon! In this post, we’ll look at how you can quickly process and analyze IR camera feeds and create triggers from them.
So what is an IR Camera?
IR stands for infrared, which is a small part of the whole light spectrum that isn’t perceptible by our eyes. An IR Camera detects and measures this specific region of the light spectrum and it’s very common for many IR cameras to also have IR LEDs or emitters on them so they can flood the environment with IR light that isn’t perceptible to our eyes but allow for the IR camera to see. Surveillance cameras being based on IR allows them to see in the dark without actually having to light the whole space (at least not in the visible spectrum).

Preparing the IR Camera
Many IR Surveillance cameras have an auto setting to switch from normal camera mode to infrared mode when it’s dark. You can find where the light sensor is on your IR Camera and cover it with some masking tape. This will keep the camera in infrared mode even if your room is bright.

Area Detection
In this tutorial, we will build a network where whenever someone walks to the middle of the camera view, it will trigger a switch TOP.
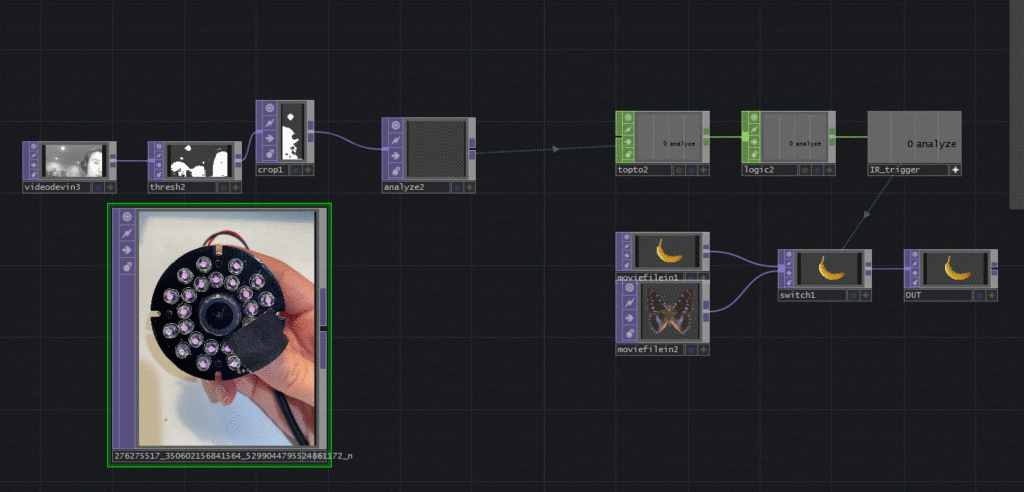
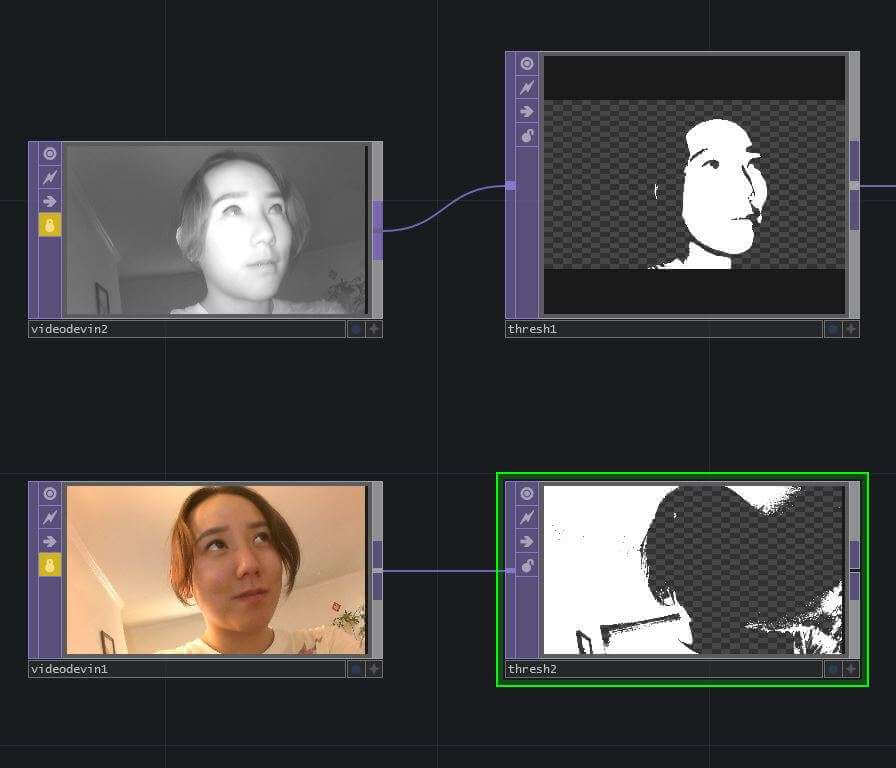
Start by adding a Video Device In TOP into the network. Change the Device parameter to the IR Camera. For testing you, you can lock the node in a position where someone is in the frame. Then you won’t need to constantly move in front of the camera.

Follow by adding a Threshold TOP after the Video Device in TOP. Adjust the Threshold parameter so you’ll get a cleaner silhouette. In IR images, the brighter something is the more IR light there is on it, which usually translates to something being in the environment.

Now we will choose the area from the IR Camera view that we want to trigger the network. For this example, I want to have the middle of the view. We can achieve that by using a Crop TOP after the Threshold TOP. Crop the area that you want to have triggered.

We can analyze the Crop TOP with, you got it, an Analyze TOP! Change the Operation parameter to Minimum Pixel. If the Video Device In TOP is locked, you can unlock it to test if the Analyze is working. When there is someone inside the Crop TOP, the Analyze TOP will turn white.

To change the analyze TOP to a number value, we will use a TOP to CHOP. Since we don’t have color values, we can leave the Green, Blue, Alpha, value blank and change the Red parameter to Analyze. If there’s someone within the Crop TOP, the CHOP will have a value greater than 0.

To clean up the CHOP data and turn the variable signal into a binary trigger we can add a Logic TOP. Change the Convert Input parameter to Off When Outside Bound. Then change the Bounds to be 0.8 and 1. Now it will only trigger with the value is between 0.8 and 1. This can help to avoid any false positives or triggers happening from random noise in the image feed.

After the Logic CHOP, let’s add a Null CHOP and rename it to IR_Trigger.
Get Our 7 Core TouchDesigner Templates, FREE
We’re making our 7 core project file templates available – for free.
These templates shed light into the most useful and sometimes obtuse features of TouchDesigner.
They’re designed to be immediately applicable for the complete TouchDesigner beginner, while also providing inspiration for the advanced user.
Implementing the Chop
Put two Movie File in TOPs in the Network. Select a different image for each TOP. Then go ahead and plug those into a Switch TOP together. Drag the IR_Trigger value to the Switch TOP parameter. Now when there is someone is in the selected area of the IR camera, it will trigger the switch and change between your idle and active content. This technique seems easy (because it is!) but it can be surprisingly effective!


Conclusion
There are a number of possibilities you can do with an IR Camera. It’s a great budget solution that can allow you to do basic detection of people in front of your installation for a very low cost. From the basics of using it to detect people in a space using Crop TOP and Analyze TOP to even more creative uses like using the thresholded silhouettes for live visuals. it’s a great and easy technique to experiment with!
