Banding is a big issue in a lot of content. It’s the thing we’re least expecting to deal with when it comes time to delivering either rendered content or a generative content. It can strike when you least expect it and picky clients will hound you till the end of the earth for it. There are lots of different ways you can deal with banding, but today we’re going to look at a great trick that one of my colleagues Aristotle Roufanis recently showed me in Notch.
What is banding?
Banding is a common term to use when you see gradients of colours forming “bands”. It’s an effect that happens on colours, especially when we’re working at 8-bit because there isn’t enough bit depth to properly capture every since colour. This causes the in-between colours in a smooth gradient to either snap up to the nearest bright colour or snap down to the nearest dark colour. A good way to think of it is similar to the the quantiziation that happens to MIDI channels (also 8-bit values) when you’re trying to make incredible smooth motions, the MIDI values still have steps in them. Those steps when visualized in a colour gradient are the bands. You’ll often find this will happen on the darker side of the gradient, because our screens and rendering pipelines are usually optimized for the brighter colours and keep more of the bits available for that region. Once you get down to dark colours and dark gradients, you aren’t left with a lot of bits!
Example setup
Lots of talk and theory but lets look at a real world example. I made a very simple scene in Notch. It’s a Shape3D node rendering a sphere to the screen. On top of that I have a Glow2 node creating a giant glow on it and my camera is zoomed in on the edge of the glow as it starts to roll off into black.

Nothing too fancy at all, right? Correct…but there’s still banding. If you zoom in on the gradient, you’ll see something like this:

If you’re still not seeing the bands, I’ve taken the same image and put a red mark on each “band” or “step” of the colour quantization:

If you’re still not seeing the banding, turn your monitor brightness all the way up and it’ll become much more apparent. So even in a simple example like this, you can see that as the colour gets towards the darker side of things, the bands become more and more apparent, whereas closer to the bright spots of the scene, they’re less noticeable.
Get Our 7 Core TouchDesigner Templates, FREE
We’re making our 7 core project file templates available – for free.
These templates shed light into the most useful and sometimes obtuse features of TouchDesigner.
They’re designed to be immediately applicable for the complete TouchDesigner beginner, while also providing inspiration for the advanced user.
How to fix it
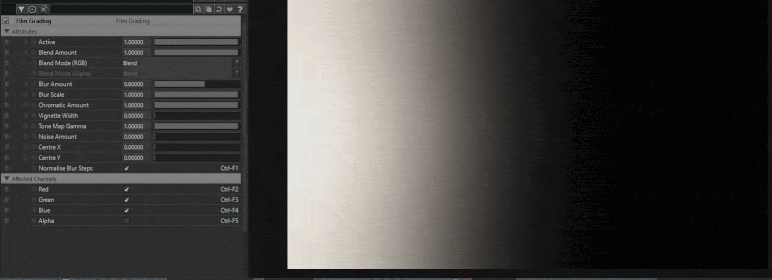
So we’ve got our problem, but how do we fix it?? Luckily there’s a common industry fix which is to add a very fine layer of noise or grain. Doing this essentially scatters a tiny bit of random data throughout the pixels so they all don’t quantize uniformly and create the visible bands. This can be done in many different ways but the trick that Aristotle was showing me means this can be done quickly, effectively, and with a minimal amount of additional processing nodes. The trick is to use the Film Grading node and take advantage of it’s ability to add grain. So start by adding a Film Grading node after your Glow2 node, which means having it below the Glow2 node:

Once you have that in there, all you need to do is slowly turn up the noise until you’re happy with the result. More noise will continue to reduce the banding, but at a certain point the noise will become visible and your render will look grainy. This is a value that will differ on a content basis, some types of content might require more noise than other. If you watch the gif below, I can quickly and easily adjust the noise value until I’m happy with the balance between less-banding and too-noisy:
Because gifs are known to have a lot of quantization and banding, here’s a screenshot of the same output with some noise added and you can see how much smoother it looks and feels:

That’s it! No magic or fuss. Just quickly and easily adding some noise at the final stage of the processing can drastically reduce any banding or quantization you’ll experience. Also the Film Grading node is a favourite as it can be used to increase contrast with it’s Tone Mapping property and more.
Wrap up
Whether you’re making generative content or pre-rendered content, banding might be a part of your life at some point and knowing how to deal with it is important. Especially when it comes to using Notch, the Film Grading node might be a great choice for quickly and easily reducing banding at the end of your pipeline. If you don’t use the Film Grading node, you can manually composite random noise or implement a similar workflow in any other software. Enjoy!