There are different ways to send values externally to a TouchDesigner network. You can use a different TouchDesigner network with a Touch Out or OSC operator or even an OSC output app, such as TouchOSC. Yet what if you want to use a web-based application to send values? This blog will give an overview of Node-RED and how to start using their tablet application, Remote-RED, to control a TouchDesigner network.
The Interactive & Immersive HQ already has a video guide on how to use Node-RED in TouchDesigner, so this blog will focus on connecting the tablet app, Remote-RED.
What is Node-RED?
Node-RED is a node-based program built upon NodeJS. It is like TouchDesigner for the web, where you can make simple applications using nodes in a browser. Although Node-RED isn’t the best for creating graphics, you can pair the web-based control panels with TouchDesigner for a more robust project workflow.

What is Remote-RED?
Remote-RED is the Android and iOS application version of the Node-RED. If you have a project where you want to send and receive OSC values from a tablet without extensive coding, this can be a helpful workflow.

Remote-RED vs TouchOSC
The benefit of using Node-RED vs a traditional OSC-sending application on a tablet is that the interface on Node-RED is more customizable, and one can also send OSC values to and from TouchDesigner rather than only accepting values. The two-way OSC stream can be helpful if you want live data displayed on a tablet interface or the performance of the TouchDesigner network displayed. Especially if that data is more complex or requires some additional parsing.
Get Started with Remote-RED
Follow the Interactive & Immersive HQ’s How to Connect Node-red and TouchDesigner in Under 10 Minutes video to get started with Node-RED.
Remember to use Node-RED; you will need to:

Download Remote-RED
Remote-RED is available on both Android and iOS devices. It is free to download but may have subscription fees within the application.
Get Our 7 Core TouchDesigner Templates, FREE
We’re making our 7 core project file templates available – for free.
These templates shed light into the most useful and sometimes obtuse features of TouchDesigner.
They’re designed to be immediately applicable for the complete TouchDesigner beginner, while also providing inspiration for the advanced user.
Remote-RED to TouchDesigner
Setting up Remote-RED in Node-RED
Like the OSC Node, Node-RED doesn’t have the Remote-RED node built-in. If you click the top right drop-down menu, select “Manage Palette.”
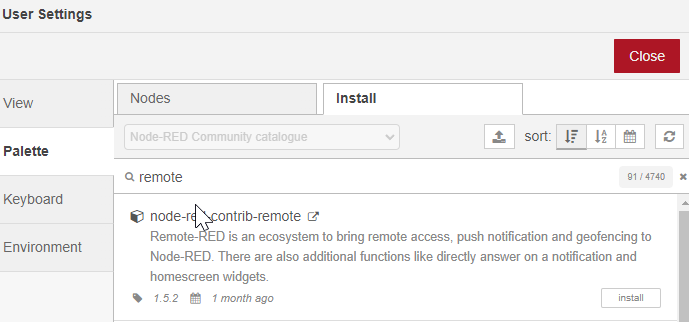
Under the ‘Install’ page, type in Remote. Install the package named “node-red-contrib-remote“.
Once the Node is installed, you will see a Remote section in the left Node window.

Drag and drop the ‘remote access’ Node into your flow.

Double-click on the Node and click on the pencil icon on the Config line.

Change the Server location to your region and click “Connect Remote-RED App.’
A QR code will appear.

Remote-RED application
On your device, open the Remote-RED application. Select the ‘Add Node-RED instance’ option and scan the QR code.

You will see a path on the application for ‘Node-RED UI.’ However, you will see the UI on your device once you Deploy the Node-RED Flow.

You should be able to have the same UI created in Node-RED on your tablet or mobile device and send your data to/from TouchDesigner.

Wrap-Up
This blog is a quick guide on how you can get started with Remote-RED with TouchDesigner. With this workflow, you can create a custom UI for your TouchDesigner project and send data from TouchDesigner to the Remote-RED interface. This process can be used for art installations, show controls, etc. How will you apply Remote-RED in your next project?