[Editor’s note from Elburz: Hi all! Today we’ve got a great in-depth guest post from Crystal Jow about her process in making this piece of analog-digital hybrid art in TouchDesigner that is audio reactive. She goes through all the nuts and bolts and has kindly provided a TouchDesigner project file you can download and experiment with as well. Everything from the content, she does a lot of great work, and I’d highly suggest checking out her Instagram account by clicking here. Enjoy!]
Do you ever wonder how to get a 2D analog look in TouchDesigner? Or do you wonder how you can make your physical sketches to be audio reactive? Then this how-to is perfect for you.

You can follow along with the project files below:
Preparing the Assets
Start off drawing and painting a frame of the eye open and another frame with the eye closed.

Scan the illustration and open the files in Photoshop. Make the background transparent by double-clicking the layer and adjusting the blending option.

Do the same for the eyes closed file. Save the file as a PNG file.

For more visual variation we will also have the pupil’s eye color be audio-reactive. Mask out the pupil using the Polygonal Lasso Tool and save it as another PNG file.

Eye into TouchDesigner
Open up TouchDesigner and open the assets with a Movie File In TOP. Layer the pupil file over the eye file by using an Over TOP and add a Level TOP after the pupil.

Add a Switch TOP between the open eye and close eye file. Switching the Index between 0 and 1 will make the eye “blink.”

Add a Null TOP after the Switch TOP and name the Null “eye.”
Eye Rays
To understand the technique more can watch Bileam’s tutorial:
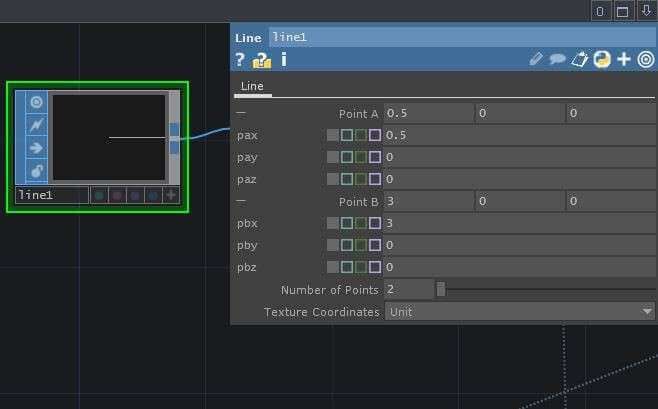
Add a Line SOP have Point A be 0.5 and Point B to 3.
Connect a Copy SOP to the Line SOP. Change the number of copies to 20 and set the Rotate rz expression to 360/me.par.ncy

Connect the Copy SOP to a Geometry COMP. Make the rays rotate by putting “absTime.frame*.1” in the Geometry Rotate rz.

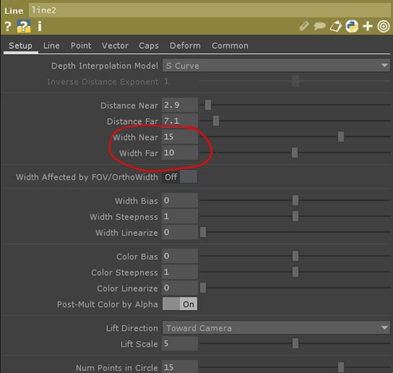
Use a Line MAT for the material. Change the Width Near to 15 and Width Far to 10.
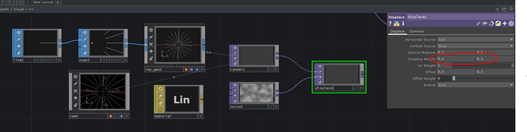
Add a Camera COMP and a Render TOP to the scene. Create a Noise TOP and connect the Render TOP and Noise TOP to a Displace TOP. In the Displace TOP set the Displace Weight to 0.1.
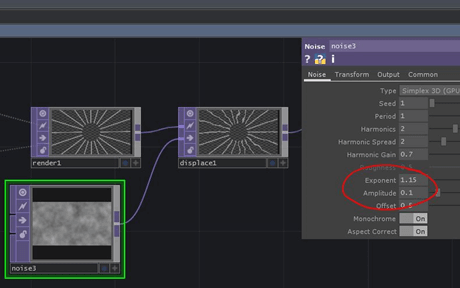
In the Noise TOP set Exponent to 1.15, Amplitude to 0.1, and the Output Resolution to 1920 x 1080
From the Palette add a feedback component after the Displace TOP. You can find the component in the Pallette under Derivative/ ImageFiter.

Color the rays by multiplying a Ramp TOP. Set the ramp as Circular and Output Resolution 1920 x 1080. Change the ramp colors to your desired color.

Add a Background
Add another Ramp TOP. Change the Output Resolution to 1920 x 1080 and set Type to Circular. Animate the ramp by adding the expression “absTime.second*.5” in the Phase parameter.
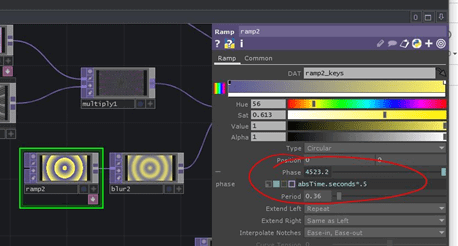
Add a Blur TOP after the Ramp TOP. Set the Pre-shrink 8 and Filter Size 32. Use a Composite TOP to composite the eye, animated rays, and background altogether. Set the Composite Operation to “Over.”
Get Our 7 Core TouchDesigner Templates, FREE
We’re making our 7 core project file templates available – for free.
These templates shed light into the most useful and sometimes obtuse features of TouchDesigner.
They’re designed to be immediately applicable for the complete TouchDesigner beginner, while also providing inspiration for the advanced user.
Set-up the Audio
The kick drum from the audio will trigger the different animation elements. Frist put an Audio File In CHOP and connect an Audio Spectrum CHOP right after. Change Audio Spectrum CHOP’s Output Length to “Set Length Manually.”

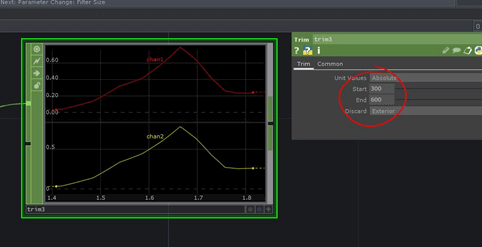
Add a Trim CHOP after the Audio Spectrum CHOP.Set the Unit Value to “Absolute.”

Look at the Audio Spectrum CHOP for where the kick drum is in the spectrum of frequencies. If you turn on Audio Spectrum TOP viewer active and right-click you can change the Units to “Samples” and Grid Details to “Grid High” to better see the range of the kick drum.

For the eye project, I set the Trim CHOP start at 300 and end 600.
Add an Analyze CHOP after the Trim CHOP. Set the Function as “Maximum.”

Combine the two channels with a Math CHOP. set Combine Channels as “Average.”

Add a Null CHOP after the Math CHOP, rename the null to “AudioFrequency.”
TouchDesigner Set up to Become Audio-Reactive
Make the Eye Blink
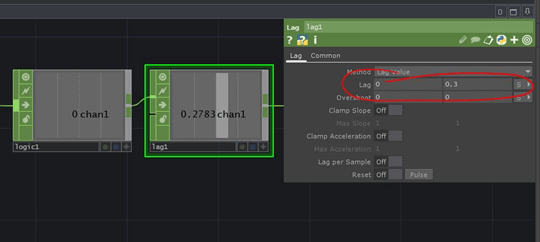
Add a Logic CHOP after the AudioFrequency Null. Change the Convert Input setting to “Off when Outside Bounds” and have the bounds to be 1.2 and 2. The bounds is the peak of the frequency.

Add a Lag CHOP after the Logic CHOP and set the Lag to 0 and 0.3.
Add another Math CHOP after the Logic CHOP and change the Integer setting to “Floor.” This data will be used to switch the eye open and closed.

Add a Rename CHOP and rename to eyeSwitch. Add a Null CHOP afterward and reference that value as the Index parameter of the Switch TOP that switches between the eye close and eye open.

Audio-Reactive Eye Scale in TouchDesigner
Create a Math CHOP from AudioFrequency Null. We’re starting a new chain of processing the data that will control the scale of the eye. Change the range of the Math CHOP to 1.2 to 1.6.

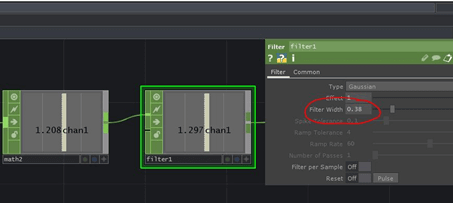
Add a Filter CHOP and change the Filter Width setting to 0.38. The filter makes the movement smoother.
Add a Rename CHOP and rename the chain to “eyeScale”. Add a Null CHOP after the Rename CHOP. Create a Transform TOP after the eye Null TOP. Reference the eyeScale value as Transform TOP Scale sx and sy.

Audio-Reactive Pupil Color
Create a Lag CHOP from the AudioFrequency Null. Change the Lag setting to 0 and 0.3.

Add a Rename CHOP after the Lag CHOP and rename to “eyeColor”. Add a null CHOP after the Rename CHOP. Reference the data value as the High R value in the Level TOP for the pupil.

Post Processing
Post-processing is really what adds the polish to these kinds of things. You’ll see in this project some of the effects I used like adding a glow behind the eye and adding grain to the visual to give a more analog look. You can also add other filtered from the palette that can help improve the quality of the final product.
Takeaway
No need for keyframing! Now you can turn any of your sketches into an audio-reactive masterpiece! You can explore different tracks and see different results you can achieve
